2016年6月12日 星期日

Android WearableListView 手錶 列表

建立Android手錶列表清單(圖+文字)

1.建立一個空白手錶專案
2.修改/res/layout/rect_activity_main.xml
<?xml version="1.0" encoding="utf-8"?>
<LinearLayout xmlns:android="http://schemas.android.com/apk/res/android"
    xmlns:tools="http://schemas.android.com/tools"
    android:layout_width="match_parent"
    android:layout_height="match_parent"
    android:background="#FFFFFF"
    android:orientation="vertical"
    tools:context="com.terryyamg.wearablelistviewtest.MainActivity"
    tools:deviceIds="wear_square">

    <android.support.wearable.view.WearableListView
        android:id="@+id/wearable_list"
        android:layout_width="match_parent"
        android:layout_height="match_parent"></android.support.wearable.view.WearableListView>

</LinearLayout>
3.修改/res/layout/round_activity_main.xml
<?xml version="1.0" encoding="utf-8"?>
<RelativeLayout xmlns:android="http://schemas.android.com/apk/res/android"
    xmlns:tools="http://schemas.android.com/tools"
    android:layout_width="match_parent"
    android:layout_height="match_parent"
    android:background="#FFFFFF"
    tools:context="com.terryyamg.wearablelistviewtest.MainActivity"
    tools:deviceIds="wear_round">

    <android.support.wearable.view.WearableListView
        android:id="@+id/wearable_list"
        android:layout_width="match_parent"
        android:layout_height="match_parent"></android.support.wearable.view.WearableListView>

</RelativeLayout>
4.建立/res/layout/list_item.xml
<com.terryyamg.wearablelistviewtest.WearableListItemLayout
    xmlns:android="http://schemas.android.com/apk/res/android"
    android:layout_width="match_parent"
    android:layout_height="80dp"
    android:gravity="center_vertical">

    <android.support.wearable.view.CircledImageView
        android:id="@+id/iv"
        android:layout_width="50dip"
        android:layout_height="50dip"
        android:layout_gravity="center_vertical"
        android:layout_margin="20dp"></android.support.wearable.view.CircledImageView>

    <TextView
        android:id="@+id/tv"
        android:layout_width="wrap_content"
        android:layout_height="match_parent"
        android:layout_marginRight="16dp"
        android:fontFamily="sans-serif-condensed-light"
        android:gravity="center_vertical|left"
        android:lineSpacingExtra="-4sp"
        android:textColor="#000000"
        android:textSize="16sp"></TextView>
</com.terryyamg.wearablelistviewtest.WearableListItemLayout>
5.新增WearableListItemLayout.java
package com.terryyamg.wearablelistviewtest;

import android.content.Context;
import android.support.wearable.view.CircledImageView;
import android.support.wearable.view.WearableListView;
import android.util.AttributeSet;
import android.widget.LinearLayout;
import android.widget.TextView;

public class WearableListItemLayout extends LinearLayout
        implements WearableListView.OnCenterProximityListener {

    private CircledImageView mImageView;
    private TextView mTextView;

    public WearableListItemLayout(Context context) {
        this(context, null);
    }

    public WearableListItemLayout(Context context, AttributeSet attrs) {
        this(context, attrs, 0);
    }

    public WearableListItemLayout(Context context, AttributeSet attrs,
                                  int defStyle) {
        super(context, attrs, defStyle);

    }

    // Get references to the icon and text in the item layout definition
    @Override
    protected void onFinishInflate() {
        super.onFinishInflate();
        // These are defined in the layout file for list items
        // (see next section)
        mImageView = (CircledImageView) findViewById(R.id.iv);
        mTextView = (TextView) findViewById(R.id.tv);
    }

    @Override
    public void onCenterPosition(boolean animate) {
        //在中間
        mImageView.setScaleX(1f);
        mImageView.setScaleY(1f);
        mTextView.setAlpha(1f);
    }

    @Override
    public void onNonCenterPosition(boolean animate) {
        //其他部分 圖縮小 文字透明一半
        mImageView.setScaleX(0.8f);
        mImageView.setScaleY(0.8f);
        mTextView.setAlpha(0.5f);
    }
}
6.新增MyAdapter.java
package com.terryyamg.wearablelistviewtest;

import android.content.Context;
import android.support.wearable.view.CircledImageView;
import android.support.wearable.view.WearableListView;
import android.view.LayoutInflater;
import android.view.View;
import android.view.ViewGroup;
import android.widget.TextView;

public class MyAdapter extends WearableListView.Adapter {
    private int[] mImage;
    private String[] mDataset;
    private final Context mContext;
    private final LayoutInflater mInflater;

    // Provide a suitable constructor (depends on the kind of dataset)
    public MyAdapter(Context context,int[] imageData, String[] dataset) {
        mContext = context;
        mInflater = LayoutInflater.from(context);
        mImage = imageData;
        mDataset = dataset;
    }

    // Provide a reference to the type of views you're using
    public static class ItemViewHolder extends WearableListView.ViewHolder {
        private CircledImageView imageView;
        private TextView textView;

        public ItemViewHolder(View itemView) {
            super(itemView);
            // find the text view within the custom item's layout
            imageView = (CircledImageView) itemView.findViewById(R.id.iv);
            textView = (TextView) itemView.findViewById(R.id.tv);
        }
    }

    // Create new views for list items
    // (invoked by the WearableListView's layout manager)
    @Override
    public WearableListView.ViewHolder onCreateViewHolder(ViewGroup parent,
                                                          int viewType) {
        // 對應list_item layout
        return new ItemViewHolder(mInflater.inflate(R.layout.list_item, null));
    }

    // Replace the contents of a list item
    // Instead of creating new views, the list tries to recycle existing ones
    // (invoked by the WearableListView's layout manager)
    @Override
    public void onBindViewHolder(WearableListView.ViewHolder holder,
                                 int position) {
        // retrieve the text view
        ItemViewHolder itemHolder = (ItemViewHolder) holder;
        CircledImageView iv = itemHolder.imageView;
        TextView view = itemHolder.textView;
        // 放入圖片、文字
        iv.setImageResource(mImage[position]);
        view.setText(mDataset[position]);
        // 設定tag id
        holder.itemView.setTag(position);
    }

    // Return the size of your dataset
    // (invoked by the WearableListView's layout manager)
    @Override
    public int getItemCount() {
        return mDataset.length;
    }
}

7.放入三張圖片(google.png,facebook.png,twitter.png)在/res/drawable/

8.MainActivity.java
package com.terryyamg.wearablelistviewtest;

import android.app.Activity;
import android.os.Bundle;
import android.support.wearable.view.WatchViewStub;
import android.support.wearable.view.WearableListView;
import android.widget.Toast;

public class MainActivity extends Activity {

    private int[] ivItems;
    private String[] tvItems;

    @Override
    protected void onCreate(Bundle savedInstanceState) {
        super.onCreate(savedInstanceState);
        setContentView(R.layout.activity_main);

        ivItems = new int[]{R.drawable.google, R.drawable.facebook, R.drawable.twitter}; //圖
        tvItems = new String[]{"Google", "Facebook", "Twitter"}; //文字

        final WatchViewStub stub = (WatchViewStub) findViewById(R.id.watch_view_stub);
        stub.setOnLayoutInflatedListener(new WatchViewStub.OnLayoutInflatedListener() {
            @Override
            public void onLayoutInflated(WatchViewStub stub) {
                // Get the list component from the layout of the activity
                WearableListView listView =
                        (WearableListView) stub.findViewById(R.id.wearable_list);

                // Assign an adapter to the list
                listView.setAdapter(new MyAdapter(MainActivity.this, ivItems, tvItems));
                listView.setClickListener(new WearableListView.ClickListener() {
                    @Override
                    public void onClick(WearableListView.ViewHolder viewHolder) {
                        Integer tag = (Integer) viewHolder.itemView.getTag();
                        Toast.makeText(MainActivity.this,tvItems[tag],Toast.LENGTH_SHORT).show();
                    }

                    @Override
                    public void onTopEmptyRegionClick() {

                    }
                });
            }
        });
    }
}

檔案下載:
https://github.com/terryyamg/WearableListViewTest
參考來源:
https://developer.android.com/training/wearables/ui/lists.html
http://www.learnandroidwear.com/sample-1/
https://gist.github.com/PomepuyN/c30760eaee1e58fdd8fa

2016年6月7日 星期二

Android Wear 穿帶手錶 測試 APP 移除

由於在穿戴手錶上測試App,穿戴式手表無法自己移除App
須借由adb.exe進行移除

1.找到android-sdk -> platform-tools

2.下adb devices指令找到目前連結的裝置ID

3.下 adb -s [裝置id] uninstall [包裹名稱]

4.完成出現success
 

參考連結:
http://stackoverflow.com/questions/24687375/uninstall-android-wear-app-from-real-device

2016年5月8日 星期日

iOS Swift GPS 定位

定位功能

1.Main.storyboard拉label

2.在Info.plist的 Information Property List點"+",
在左邊key輸入"NSLocationWhenInUseUsageDescription"
在右邊Value輸入"The application uses this information to show you your location"

3.ViewController.swift

import UIKit
import CoreLocation

class ViewController: UIViewController, CLLocationManagerDelegate {
    
    
    @IBOutlet weak var lblLat: UILabel!
    @IBOutlet weak var lblLon: UILabel!
    @IBOutlet weak var lblHorizontal: UILabel!
    @IBOutlet weak var lblAltitude: UILabel!
    @IBOutlet weak var lblVertical: UILabel!
    @IBOutlet weak var lblDistance: UILabel!
    
    var locationManager: CLLocationManager = CLLocationManager()
    var startLocation: CLLocation!
    
    override func viewDidLoad() {
        super.viewDidLoad()
        
        locationManager.desiredAccuracy = kCLLocationAccuracyBest
        locationManager.delegate = self
        locationManager.requestWhenInUseAuthorization()
        locationManager.startUpdatingLocation()
        
        startLocation = CLLocation(latitude: 22.6657786, longitude: 120.3033831) //目標緯度經度
        
        
    }
    
    override func didReceiveMemoryWarning() {
        super.didReceiveMemoryWarning()
    }
    
    func locationManager(manager: CLLocationManager, didUpdateLocations locations: [CLLocation]) {
        //定位資訊
        let latestLocation: AnyObject = locations[locations.count - 1]
        
        lblLat.text = String(format: "%.4f", latestLocation.coordinate.latitude) //緯度
        lblLon.text = String(format: "%.4f", latestLocation.coordinate.longitude) //經度
        lblHorizontal.text = String(format: "%.4f", latestLocation.horizontalAccuracy) //水平精度
        lblAltitude.text = String(format: "%.4f", latestLocation.altitude) //海拔高度
        lblVertical.text = String(format: "%.4f", latestLocation.verticalAccuracy) //垂直精度
        
        let distanceBetween: CLLocationDistance =
            latestLocation.distanceFromLocation(startLocation) //計算startLocation與latestLocation距離
        
        lblDistance.text = String(format: "%.2f", distanceBetween) //距離 公尺
    }
    
    func locationManager(manager: CLLocationManager,
                         didFailWithError error: NSError) {
        
    }
    
}


3.參考連結:
http://www.techotopia.com/index.php/A_Swift_Example_iOS_8_Location_Application
http://stackoverflow.com/questions/29931302/initialize-a-cllocation-object-in-swift-with-latitude-and-longitude

2016年4月21日 星期四

iOS Swift Photo Gallery Collection View 照片 相簿

iOS Swift的相簿使用
1.建立專案後,拉一個Collection View


2.拉一個Image View進去Collection View Cell裡面

3.點選Collection View Cell -> 在Identifier輸入名稱 這裡設定cell

4.在Collection View點右鍵 ->連結dataSource與delegate到View Controller


5.建立一個Cell.swift檔案,點選cell,在Class選擇Cell
接著把Image View拉過去建立 var imgView

import UIKit

class Cell: UICollectionViewCell {
    

    @IBOutlet var imgView: UIImageView!
    
}


6.放入兩張測試用圖片

7.ViewController.swift
import UIKit

class ViewController: UIViewController, UICollectionViewDataSource, UICollectionViewDelegate{

    let photoCount = 2 //照片張數
    
    override func viewDidLoad() {
        super.viewDidLoad()
        
    }

    override func didReceiveMemoryWarning() {
        super.didReceiveMemoryWarning()
        
    }

    func numberOfSectionsInCollectionView(collectionView: UICollectionView) -> Int {
        return 1
    }
    
    func collectionView(collectionView: UICollectionView, numberOfItemsInSection section: Int) -> Int {
        return photoCount
    }
    
    func collectionView(collectionView: UICollectionView, cellForItemAtIndexPath indexPath: NSIndexPath) -> UICollectionViewCell {

        //取得cell
        let cell: Cell = collectionView.dequeueReusableCellWithReuseIdentifier("cell", forIndexPath: indexPath) as! Cell
        print("indexPath:\(indexPath.row)")
        if indexPath.row == 0{
            cell.imgView.image = UIImage(named: "p1.jpg") // 放入第一張
        }else{
            cell.imgView.image = UIImage(named: "p2.jpg") // 放入第二張
        }
        
        return cell
    }

}


檔案下載:
https://github.com/terryyamg/PhotosGalleryTest
參考來源:
https://github.com/TDAbboud/PhotosGalleryApp
http://www.brianjcoleman.com/tutorial-collection-view-using-swift/

2016年4月3日 星期日

iOS Swift Radio Button

1.建立一個專案
2.建立兩個SSRadioButton.swift與SSRadioButtonsController.swift檔案


SSRadioButton.swift
//
//  SSRadioButton.swift
//  SampleProject
//
//  Created by Shamas on 18/05/2015.
//  Copyright (c) 2015 Al Shamas Tufail. All rights reserved.
//

import Foundation
import UIKit
@IBDesignable

class SSRadioButton: UIButton {
    
    private var circleLayer = CAShapeLayer()
    private var fillCircleLayer = CAShapeLayer()
    override var selected: Bool {
        didSet {
            toggleButon()
        }
    }
    /**
     Color of the radio button circle. Default value is UIColor red.
     */
    @IBInspectable var circleColor: UIColor = UIColor.redColor() {
        didSet {
            circleLayer.strokeColor = circleColor.CGColor
            self.toggleButon()
        }
    }
    /**
     Radius of RadioButton circle.
     */
    @IBInspectable var circleRadius: CGFloat = 5.0
    @IBInspectable var cornerRadius: CGFloat {
        get {
            return layer.cornerRadius
        }
        set {
            layer.cornerRadius = newValue
            layer.masksToBounds = newValue > 0
        }
    }
    
    private func circleFrame() -> CGRect {
        var circleFrame = CGRect(x: 0, y: 0, width: 2*circleRadius, height: 2*circleRadius)
        circleFrame.origin.x = 0 + circleLayer.lineWidth
        circleFrame.origin.y = bounds.height/2 - circleFrame.height/2
        return circleFrame
    }
    
    required init?(coder aDecoder: NSCoder) {
        super.init(coder: aDecoder)
        initialize()
    }
    
    override init(frame: CGRect) {
        super.init(frame: frame)
        initialize()
    }
    
    private func initialize() {
        circleLayer.frame = bounds
        circleLayer.lineWidth = 2
        circleLayer.fillColor = UIColor.clearColor().CGColor
        circleLayer.strokeColor = circleColor.CGColor
        layer.addSublayer(circleLayer)
        fillCircleLayer.frame = bounds
        fillCircleLayer.lineWidth = 2
        fillCircleLayer.fillColor = UIColor.clearColor().CGColor
        fillCircleLayer.strokeColor = UIColor.clearColor().CGColor
        layer.addSublayer(fillCircleLayer)
        self.titleEdgeInsets = UIEdgeInsetsMake(0, (4*circleRadius + 4*circleLayer.lineWidth), 0, 0)
        self.toggleButon()
    }
    /**
     Toggles selected state of the button.
     */
    func toggleButon() {
        if self.selected {
            fillCircleLayer.fillColor = circleColor.CGColor
        } else {
            fillCircleLayer.fillColor = UIColor.clearColor().CGColor
        }
    }
    
    private func circlePath() -> UIBezierPath {
        return UIBezierPath(ovalInRect: circleFrame())
    }
    
    private func fillCirclePath() -> UIBezierPath {
        return UIBezierPath(ovalInRect: CGRectInset(circleFrame(), 2, 2))
    }
    
    override func layoutSubviews() {
        super.layoutSubviews()
        circleLayer.frame = bounds
        circleLayer.path = circlePath().CGPath
        fillCircleLayer.frame = bounds
        fillCircleLayer.path = fillCirclePath().CGPath
        self.titleEdgeInsets = UIEdgeInsetsMake(0, (2*circleRadius + 4*circleLayer.lineWidth), 0, 0)
    }
    
    override func prepareForInterfaceBuilder() {
        initialize()
    }
}

SSRadioButtonsController.swift
//
//  RadioButtonsController.swift
//  TestApp
//
//  Created by Al Shamas Tufail on 24/03/2015.
//  Copyright (c) 2015 Al Shamas Tufail. All rights reserved.
//

import Foundation
import UIKit

/// RadioButtonControllerDelegate. Delegate optionally implements didSelectButton that receives selected button.
@objc protocol SSRadioButtonControllerDelegate {
    /**
     This function is called when a button is selected. If 'shouldLetDeSelect' is true, and a button is deselected, this function
     is called with a nil.
     
     */
    optional func didSelectButton(aButton: UIButton?)
}

class SSRadioButtonsController : NSObject
{
    private var buttonsArray = [UIButton]()
    private weak var currentSelectedButton:UIButton? = nil
    weak var delegate : SSRadioButtonControllerDelegate? = nil
    /**
     Set whether a selected radio button can be deselected or not. Default value is false.
     */
    var shouldLetDeSelect = false
    /**
     Variadic parameter init that accepts UIButtons.
     
     - parameter buttons: Buttons that should behave as Radio Buttons
     */
    init(buttons: UIButton...) {
        super.init()
        for aButton in buttons {
            aButton.addTarget(self, action: #selector(SSRadioButtonsController.pressed(_:)), forControlEvents: UIControlEvents.TouchUpInside)
        }
        self.buttonsArray = buttons
    }
    /**
     Add a UIButton to Controller
     
     - parameter button: Add the button to controller.
     */
    func addButton(aButton: UIButton) {
        buttonsArray.append(aButton)
        aButton.addTarget(self, action: #selector(SSRadioButtonsController.pressed(_:)), forControlEvents: UIControlEvents.TouchUpInside)
    }
    /**
     Remove a UIButton from controller.
     
     - parameter button: Button to be removed from controller.
     */
    func removeButton(aButton: UIButton) {
        let iteration = 0
        var iteratingButton: UIButton? = nil
        for i in iteration..<buttonsArray.count {
            iteratingButton = buttonsArray[i]
            if(iteratingButton == aButton) {
                break
            } else {
                iteratingButton = nil
            }
        }
        if(iteratingButton != nil) {
            buttonsArray.removeAtIndex(iteration)
            iteratingButton!.removeTarget(self, action: #selector(SSRadioButtonsController.pressed(_:)), forControlEvents: UIControlEvents.TouchUpInside)
            if currentSelectedButton == iteratingButton {
                currentSelectedButton = nil
            }
        }
    }
    /**
     Set an array of UIButons to behave as controller.
     
     - parameter buttonArray: Array of buttons
     */
    func setButtonsArray(aButtonsArray: [UIButton]) {
        for aButton in aButtonsArray {
            aButton.addTarget(self, action: #selector(SSRadioButtonsController.pressed(_:)), forControlEvents: UIControlEvents.TouchUpInside)
        }
        buttonsArray = aButtonsArray
    }
    
    func pressed(sender: UIButton) {
        if(sender.selected) {
            if shouldLetDeSelect {
                sender.selected = false
                currentSelectedButton = nil
            }
        } else {
            for aButton in buttonsArray {
                aButton.selected = false
            }
            sender.selected = true
            currentSelectedButton = sender
        }
        delegate?.didSelectButton?(currentSelectedButton)
    }
    /**
     Get the currently selected button.
     
     - returns: Currenlty selected button.
     */
    func selectedButton() -> UIButton? {
        return currentSelectedButton
    }
}
3.在Main.storyboard拉三個button

4.連結Button至ViewController.swift

5.選擇Buuton->點選Show the Identity inspector ->Class選SSRadioButton
方法一:點選+ 新增circleColor與circleRadius

方法二:點選Show the Attributes inspector會出現Radio Button 去設定

6.ViewController.swift
import UIKit

class ViewController: UIViewController, SSRadioButtonControllerDelegate  {

    @IBOutlet weak var bt1: UIButton!
    @IBOutlet weak var bt2: UIButton!
    @IBOutlet weak var bt3: UIButton!
    
    var radioButtonController: SSRadioButtonsController?
    
    override func viewDidLoad() {
        super.viewDidLoad()
        // Do any additional setup after loading the view, typically from a nib.
        radioButtonController = SSRadioButtonsController(buttons: bt1, bt2, bt3)
        radioButtonController!.delegate = self
        radioButtonController!.shouldLetDeSelect = true //true:點第二下取消 false:點第二下仍是選擇
    }

    override func didReceiveMemoryWarning() {
        super.didReceiveMemoryWarning()
        // Dispose of any resources that can be recreated.
    }
    
    func didSelectButton(aButton: UIButton?) {
        let currentButton = radioButtonController!.selectedButton()!
        print("點選\(currentButton.currentTitle!)")
    }


}


檔案下載: https://github.com/terryyamg/Swift-RadioButtonTest
參考連結: https://github.com/shamasshahid/SSRadioButtonsController

2016年3月17日 星期四

Android RecognizerIntent TextToSpeech 跟Android對話

先說關鍵字(ok),Android說出對應的關鍵字(google)

1./res/layout/activity_main.xml


2.MainActivity.java
package com.terryyamg.voicecontroltest;

import android.app.Activity;
import android.content.Intent;
import android.os.Build;
import android.os.Bundle;
import android.speech.RecognizerIntent;
import android.speech.tts.TextToSpeech;
import android.view.View;
import android.widget.ArrayAdapter;
import android.widget.Button;
import android.widget.ListView;
import android.widget.Toast;

import java.util.ArrayList;
import java.util.Locale;

public class MainActivity extends Activity {

    public static final int VOICE_RECOGNITION_REQUEST_CODE = 9527; //對應用數字

    private ListView lvSpeak;
    private TextToSpeech toSpeech;

    @Override
    public void onCreate(Bundle savedInstanceState) {
        super.onCreate(savedInstanceState);
        setContentView(R.layout.activity_main);

        Button btMessage = (Button) findViewById(R.id.btMessage);
        lvSpeak = (ListView) findViewById(R.id.lvSpeak);
        showMic(); //顯示麥克風收音

        //TextToSpeech 初始化
        toSpeech=new TextToSpeech(getApplicationContext(), new TextToSpeech.OnInitListener() {
            @Override
            public void onInit(int status) {
                if(status != TextToSpeech.ERROR) {
                    toSpeech.setLanguage(Locale.US);
                }
            }
        });

        //再說一次
        btMessage.setOnClickListener(new View.OnClickListener() {
            @Override
            public void onClick(View v) {
                showMic();
            }
        });

    }

    //顯示麥克風收音
    private void showMic(){
        Intent intent = new Intent(RecognizerIntent.ACTION_RECOGNIZE_SPEECH);
        intent.putExtra(RecognizerIntent.EXTRA_LANGUAGE_MODEL,
                RecognizerIntent.LANGUAGE_MODEL_FREE_FORM);
        intent.putExtra(RecognizerIntent.EXTRA_PROMPT,
                "Say OK!");
        startActivityForResult(intent, VOICE_RECOGNITION_REQUEST_CODE);
    }

    @Override
    public void onActivityResult(int requestCode, int resultCode, Intent data) {
        super.onActivityResult(requestCode, resultCode, data);

        if (requestCode == VOICE_RECOGNITION_REQUEST_CODE && resultCode == RESULT_OK) {

            ArrayList matches = data.getStringArrayListExtra(RecognizerIntent.EXTRA_RESULTS);
            lvSpeak.setAdapter(new ArrayAdapter(this, android.R.layout.simple_list_item_1, matches)); //列出辨識出的句子

            if (matches.contains("OK")) { //比對句子
                //Android 說 google
                if (Build.VERSION.SDK_INT >= Build.VERSION_CODES.LOLLIPOP) {
                    String utteranceId=this.hashCode() + "";
                    toSpeech.speak("google", TextToSpeech.QUEUE_FLUSH, null, utteranceId);
                } else {
                    toSpeech.speak("google", TextToSpeech.QUEUE_FLUSH, null);
                }

            }else{
                Toast.makeText(this,"查無此句,請重試",Toast.LENGTH_SHORT).show();
            }
        }
    }

}
1


檔案下載:
https://github.com/terryyamg/VoiceControlTest
參考連結:
http://stackoverflow.com/questions/11798337/how-to-voice-commands-into-an-android-application
http://www.tutorialspoint.com/android/android_text_to_speech.htm
http://stackoverflow.com/questions/27968146/texttospeech-with-api-21

2016年3月15日 星期二

Android Google Analytics V4 快速使用

使用Google Analytics來觀看app使用情形

1.先前往https://www.google.com/analytics/web/#home/
登入Google帳號,申請一個專案,就會得到一組序號
長這樣: UA-75136xxx-1

2.這裡IDE用Android studio,在build.gradle(Module:app)加入
compile 'com.google.android.gms:play-services-analytics:8.4.0'

3.建立一個app,在res資料夾下建立一個xml資料夾
建立app_tracker.xml檔案,位置/res/xml/app_tracker.xml


    300

    
    true

    
    UA-75136xxx-1

    100.0

    true


3.建立AnalyticsTrackers.java
package com.terryyamg.analyticstest;

import android.content.Context;

import com.google.android.gms.analytics.GoogleAnalytics;
import com.google.android.gms.analytics.Tracker;

import java.util.HashMap;
import java.util.Map;

/**
 * A collection of Google Analytics trackers. Fetch the tracker you need using
 * {@code AnalyticsTrackers.getInstance().get(...)}
 * <p/>
 * This code was generated by Android Studio but can be safely modified by
 * hand at this point.
 * <p/>
 * TODO: Call {@link #initialize(Context)} from an entry point in your app
 * before using this!
 */
public final class AnalyticsTrackers {

    public enum Target {
        APP,
        // Add more trackers here if you need, and update the code in #get(Target) below
    }

    private static AnalyticsTrackers sInstance;

    public static synchronized void initialize(Context context) {
        if (sInstance != null) {
            throw new IllegalStateException("Extra call to initialize analytics trackers");
        }

        sInstance = new AnalyticsTrackers(context);
    }

    public static synchronized AnalyticsTrackers getInstance() {
        if (sInstance == null) {
            throw new IllegalStateException("Call initialize() before getInstance()");
        }

        return sInstance;
    }

    private final Map<Target, Tracker> mTrackers = new HashMap<Target, Tracker>();
    private final Context mContext;

    /**
     * Don't instantiate directly - use {@link #getInstance()} instead.
     */
    private AnalyticsTrackers(Context context) {
        mContext = context.getApplicationContext();
    }

    public synchronized Tracker get(Target target) {
        if (!mTrackers.containsKey(target)) {
            Tracker tracker;
            switch (target) {
                case APP:
                    tracker = GoogleAnalytics.getInstance(mContext).newTracker(R.xml.app_tracker);
                    break;
                default:
                    throw new IllegalArgumentException("Unhandled analytics target " + target);
            }
            mTrackers.put(target, tracker);
        }

        return mTrackers.get(target);
    }
}
4.建立MyApplication.java
package com.terryyamg.analyticstest;

import android.app.Application;

import com.google.android.gms.analytics.GoogleAnalytics;
import com.google.android.gms.analytics.HitBuilders;
import com.google.android.gms.analytics.StandardExceptionParser;
import com.google.android.gms.analytics.Tracker;

public class MyApplication extends Application {
    public static final String TAG = MyApplication.class
            .getSimpleName();

    private static MyApplication mInstance;

    @Override
    public void onCreate() {
        super.onCreate();
        mInstance = this;

        AnalyticsTrackers.initialize(this);
        AnalyticsTrackers.getInstance().get(AnalyticsTrackers.Target.APP);
    }

    public static synchronized MyApplication getInstance() {
        return mInstance;
    }

    public synchronized Tracker getGoogleAnalyticsTracker() {
        AnalyticsTrackers analyticsTrackers = AnalyticsTrackers.getInstance();
        return analyticsTrackers.get(AnalyticsTrackers.Target.APP);
    }

    /***
     * Tracking screen view
     *
     * @param screenName screen name to be displayed on GA dashboard
     */
    public void trackScreenView(String screenName) {
        Tracker t = getGoogleAnalyticsTracker();

        // Set screen name.
        t.setScreenName(screenName);

        // Send a screen view.
        t.send(new HitBuilders.ScreenViewBuilder().build());

        GoogleAnalytics.getInstance(this).dispatchLocalHits();
    }

    /***
     * Tracking exception
     *
     * @param e exception to be tracked
     */
    public void trackException(Exception e) {
        if (e != null) {
            Tracker t = getGoogleAnalyticsTracker();

            t.send(new HitBuilders.ExceptionBuilder()
                            .setDescription(
                                    new StandardExceptionParser(this, null)
                                            .getDescription(Thread.currentThread().getName(), e))
                            .setFatal(false)
                            .build()
            );
        }
    }

    /***
     * Tracking event
     *
     * @param category event category
     * @param action   action of the event
     * @param label    label
     */
    public void trackEvent(String category, String action, String label) {
        Tracker t = getGoogleAnalyticsTracker();

        // Build and send an Event.
        t.send(new HitBuilders.EventBuilder().setCategory(category).setAction(action).setLabel(label).build());
    }

}
5.修改AndroidManifest.xml 加入網路權限
android.permission.INTERNET
android.permission.ACCESS_NETWORK_STATE
在application加入android:name=".MyApplication"


6.基本上到這邊就完成了,可以在https://analytics.google.com/analytics/web/看到
 7.加入異常或當機狀態,在/res/layout/activity_main.xml加個Button


8.MainActivity.java
package com.terryyamg.analyticstest;

import android.os.Bundle;
import android.support.v7.app.AppCompatActivity;
import android.util.Log;
import android.view.View;
import android.widget.Button;

public class MainActivity extends AppCompatActivity {

    @Override
    protected void onCreate(Bundle savedInstanceState) {
        super.onCreate(savedInstanceState);
        setContentView(R.layout.activity_main);

        Button btCrash = (Button) findViewById(R.id.btCrash);
        assert btCrash != null;
        btCrash.setOnClickListener(new View.OnClickListener() {
            @Override
            public void onClick(View v) {
                try{
                    String name = null;
                    if (name.equals("test")){

                    }
                }catch (Exception e){
                    MyApplication.getInstance().trackException(e); //紀錄在Google Analytics裡
                    Log.i("NullPointerException",e+"");
                }
                //註解掉try catch會直接crash,也會紀錄在Google Analytics裡面
            }
        });
    }
}

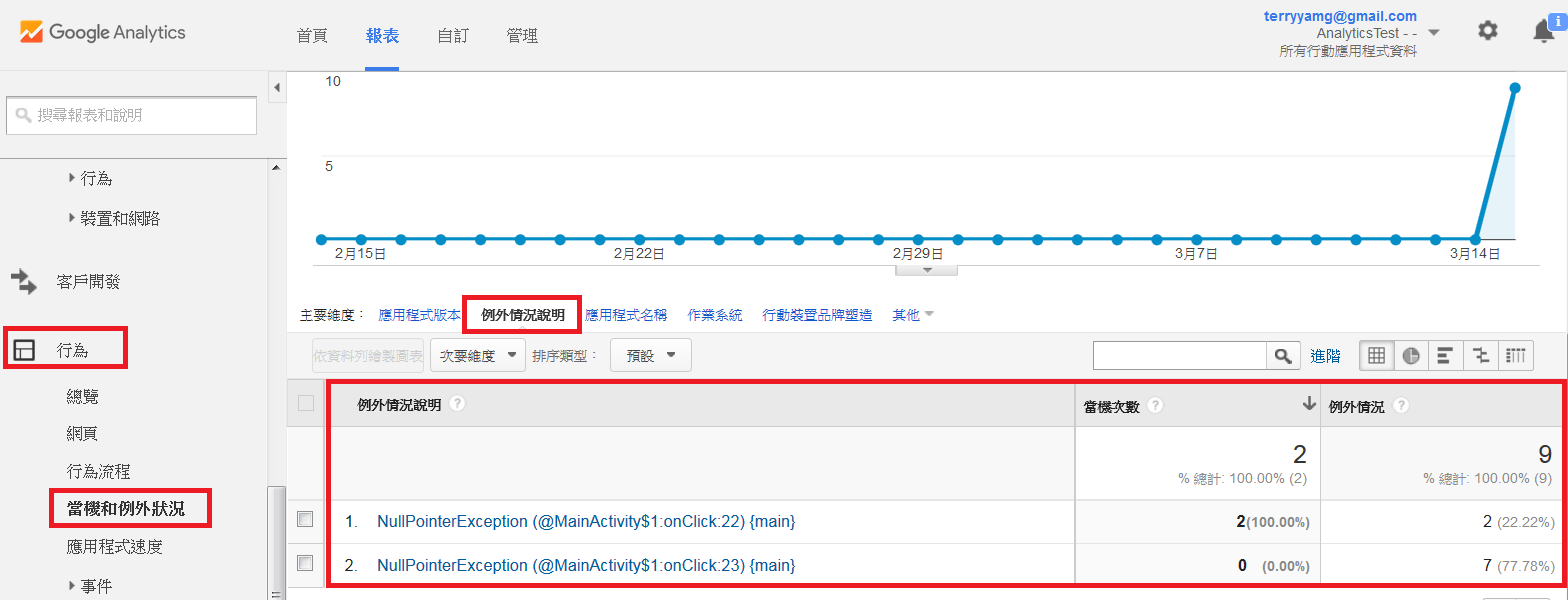
當機與例外狀況要等約一天才會出現

其餘還有其他功用,可以參考http://www.androidhive.info/2015/08/android-integrating-google-analytics-v4/

檔案下載:
 https://github.com/terryyamg/AnalyticsTest
參考連結:
http://www.androidhive.info/2015/08/android-integrating-google-analytics-v4/