顯示具有 Android 標籤的文章。 顯示所有文章

2019年3月6日 星期三

Android 產生Signed Apk時錯誤 Keystore was tampered with, or password was incorrect

在產生signed apk時

明明輸入正確密碼卻出現 Keystore was tampered with, or password was incorrect 錯誤訊息

密碼打到懷疑人生...一直以為是密碼錯誤

 於是開始找密碼  

方法一: https://github.com/nanqiu/android-keystore-password-recover/blob/master/README.md

下載這個程式 把你的xxxx.jks放到同一資料夾

建立一個關鍵字wordlist.txt

然後想想可能的關鍵字 打在裡面

打開 cmd下指令
java -jar AndroidKeystoreBrute_v1.05.jar -m 3 -k xxxx.jks -d "wordlist.txt" 

 找到密碼

結果密碼沒錯啊

回到Android Studio再產生看看, 一樣是說密碼錯誤 wtf, 難道是其中有一個密碼錯誤

於是再繼續找密碼


https://stackoverflow.com/questions/28034899/how-to-retrieve-key-alias-and-key-password-for-signed-apk-in-android-studiomigr

這篇提到如果有用過Android Studio 2.2之前的

Android Studio會有Log檔案, 裡面竟然有密碼啊啊啊啊啊

Windows系統位置在
C:\Users\xxxxx\.AndroidStudio2.2\system\log
裡面有個 idea.log.1
用記事本打開他, 搜尋一下password,  you got it !!!
兩個密碼都有
結果都正確啊啊啊啊啊啊

於是我開始懷疑根本是Android Studio的問題

https://stackoverflow.com/questions/32987530/android-studio-keystore-was-tampered-with-or-password-was-incorrect
提到換密碼就好

https://stackoverflow.com/questions/2889238/keystore-change-passwords

先找到keytool位置
C:\Program Files\Java\jdk1.8.0_73\bin
然後將你的xxxx.jks放在這
cmd下指令
 
keytool -storepasswd -keystore xxxx.jks
會要你輸入舊密碼與新密碼
 
keytool -keypasswd  -alias xxxx -keystore xxxx.jks
alias名稱要正確
然後一樣輸入舊密碼與新密碼
完成


回到Android Studio, 一定要先Clean Project
再Generate Signed Bundle/APK

成功產生!!! 害我嚇到吃手手 WTF

2017年5月23日 星期二

Firebase Cloud Messaging 接收訊息 PHP Service

FCM兩種推播通知方式 - Notification與Data

----------------------------------FCM前置步驟可觀看----------------------------------
Step1:
https://litotom.com/2016/06/24/android-firebase-cloud-messaging-1/
注意:
apply plugin: 'com.google.gms.google-services'
要放在build.gradle(Module: app)這個檔案裡面的最下面

Step2:
https://litotom.com/2016/06/26/firebase-android-send-2/

-----------------------------------------------------------------------------------------------

1.在MyFirebaseMessagingService.java加入推播通知訊息
package com.terryyamg.fcmtest;

import android.app.Notification;
import android.app.PendingIntent;
import android.content.Context;
import android.content.Intent;
import android.support.v4.app.NotificationCompat;
import android.support.v4.app.NotificationManagerCompat;
import android.util.Log;

import com.google.firebase.messaging.FirebaseMessagingService;
import com.google.firebase.messaging.RemoteMessage;

public class MyFirebaseMessagingService extends FirebaseMessagingService {

    private static final String TAG = "MyFirebaseMessaging";

    @Override
    public void onMessageReceived(RemoteMessage remoteMessage) {
        Log.i(TAG, "onMessageReceived:" + remoteMessage.getFrom());
        Intent intent = new Intent();   //點擊啟動到MainActivity頁面
        intent.setClass(this, MainActivity.class);
        showNotification(this, remoteMessage, intent);
    }

    // 顯示通知
    // remoteMessage.getData()         -  無論app在什麼狀態下皆會執行 MyFirebaseMessagingService(需對應Service設定的字串文字)
    // remoteMessage.getNotification() -  只會在app顯示時,執行app的接收訊息 MyFirebaseMessagingService
    private void showNotification(Context context, RemoteMessage remoteMessage, Intent intent) {
        NotificationManagerCompat manager = NotificationManagerCompat.from(this);
        PendingIntent iPending = PendingIntent.getActivity(context, 0, intent, PendingIntent.FLAG_UPDATE_CURRENT);

        NotificationCompat.Builder mBuilder =
                new NotificationCompat.Builder(this)
                        .setSmallIcon(R.mipmap.ic_launcher)
                        .setContentTitle(remoteMessage.getData().get("title")) //需對應Service設定的字串文字
                        .setWhen(System.currentTimeMillis())
                        .setDefaults(Notification.DEFAULT_SOUND)
                        .setContentText(remoteMessage.getData().get("body")) //需對應Service設定的字串文字
                        .setContentIntent(iPending)
                        .setAutoCancel(true);

        Notification notification = mBuilder.build();
        manager.notify(1, notification);

    }
}

2.Service推播 fcm_service.php
    #API access key from Google API's Console
    define( 'API_ACCESS_KEY', 'AAAA6iG_xzk:APA91bHxlAkx5byr66cIFk-CXAr2k3hvs4tGQV9nAzj2nw75kPC8_9eIyyZVaeUPYFYzAk10qV-D0Pwl5BsIGslvv32PI2ECap1KcmW7Iu6lyzh1A3eEE2TJ5jVsnPydWFgKjvh3J5hh' );
    $registrationIds = "dTDs6rF7h04:APA91bECmREiN_qgUJ2IBwagJRzWmVxDMWVpmjEnkgJi1FWMLAtFHGTSYVXA-0VTHMf-42mZH8qLBEdKHFs9Z6oCL1JUf0uJ232z26XJdpEuwMvVPFxunwAZPN9E4-6qKImQEb7b9iHw";
    #prep the bundle
    $msg = array
    (
     'body'  => 'Body  Of Notification',
     'title' => 'Title Of Notification'
     );
    //'notification' - 只會在app顯示時,執行app的接收訊息Service
    //'data'         - 無論app在什麼狀態皆會執行app的接收訊息Service
    $fields = array
    (
     'to'  => $registrationIds,
     'data'     => $msg
     );
    
    
    $headers = array
    (
     'Authorization: key=' . API_ACCESS_KEY,
     'Content-Type: application/json'
     );
    #Send Reponse To FireBase Server
    $ch = curl_init();
    curl_setopt( $ch,CURLOPT_URL, 'https://fcm.googleapis.com/fcm/send' );
    curl_setopt( $ch,CURLOPT_POST, true );
    curl_setopt( $ch,CURLOPT_HTTPHEADER, $headers );
    curl_setopt( $ch,CURLOPT_RETURNTRANSFER, true );
    curl_setopt( $ch,CURLOPT_SSL_VERIFYPEER, false );
    curl_setopt( $ch,CURLOPT_POSTFIELDS, json_encode( $fields ) );
    $result = curl_exec($ch );
    curl_close( $ch );
    #Echo Result Of FireBase Server
    echo $result;


檔案下載:
參考資料:


2016年12月19日 星期一

Android library Realm 資料庫

簡單的Realm資料庫CRUD應用

1.build.gradle(Project:xxxx)加入classpath "io.realm:realm-gradle-plugin:2.2.1"
buildscript {
    repositories {
        jcenter()
    }
    dependencies {
        classpath 'com.android.tools.build:gradle:2.2.3'
        classpath "io.realm:realm-gradle-plugin:2.2.1"
        // NOTE: Do not place your application dependencies here; they belong
        // in the individual module build.gradle files
    }
}

allprojects {
    repositories {
        jcenter()
    }
}

task clean(type: Delete) {
    delete rootProject.buildDir
}
2.build.gradle(Module:app)加入apply plugin: 'realm-android'
apply plugin: 'com.android.application'
apply plugin: 'realm-android'

android {
    compileSdkVersion 24
    buildToolsVersion "24.0.1"
    defaultConfig {
        applicationId "com.terryyamg.realmtest"
        minSdkVersion 19
        targetSdkVersion 24
        versionCode 1
        versionName "1.0"
        testInstrumentationRunner "android.support.test.runner.AndroidJUnitRunner"
    }
    buildTypes {
        release {
            minifyEnabled false
            proguardFiles getDefaultProguardFile('proguard-android.txt'), 'proguard-rules.pro'
        }
    }
}

dependencies {
    compile fileTree(dir: 'libs', include: ['*.jar'])
    androidTestCompile('com.android.support.test.espresso:espresso-core:2.2.2', {
        exclude group: 'com.android.support', module: 'support-annotations'
    })
    compile 'com.android.support:appcompat-v7:24.2.1'
    compile 'com.android.support:design:24.2.1'
    testCompile 'junit:junit:4.12'
}
3.AndroidManifest.xml的application內加入android:name=".MyApplication"


4.MyApplication.java
package com.terryyamg.realmtest;
import android.app.Application;
import io.realm.Realm;
public class MyApplication extends Application {

    @Override
    public void onCreate() {
        super.onCreate();
        // Initialize Realm. Should only be done once when the application starts.
        Realm.init(this);

    }
}
5.MainActivity.java
package com.terryyamg.realmtest;

import android.app.Dialog;
import android.os.Bundle;
import android.support.design.widget.FloatingActionButton;
import android.support.v7.app.AppCompatActivity;
import android.support.v7.widget.Toolbar;
import android.util.Log;
import android.view.View;
import android.view.Window;
import android.widget.Button;
import android.widget.EditText;
import android.widget.TextView;

import io.realm.Realm;
import io.realm.RealmResults;

public class MainActivity extends AppCompatActivity {

    private Realm realm;
    TextView tvMessage;

    @Override
    protected void onCreate(Bundle savedInstanceState) {
        super.onCreate(savedInstanceState);
        setContentView(R.layout.activity_main);
        Toolbar toolbar = (Toolbar) findViewById(R.id.toolbar);
        setSupportActionBar(toolbar);

        realm = Realm.getDefaultInstance();

        tvMessage = (TextView) findViewById(R.id.tvMessage);

        //Create
        FloatingActionButton fab = (FloatingActionButton) findViewById(R.id.fab);
        fab.setOnClickListener(new View.OnClickListener() {
            @Override
            public void onClick(View view) {
                create();
            }
        });
        //Update
        FloatingActionButton fabUpdate = (FloatingActionButton) findViewById(R.id.fabUpdate);
        fabUpdate.setOnClickListener(new View.OnClickListener() {
            @Override
            public void onClick(View view) {
                update();
            }
        });
        //Delete
        FloatingActionButton fabDelete = (FloatingActionButton) findViewById(R.id.fabDelete);
        fabDelete.setOnClickListener(new View.OnClickListener() {
            @Override
            public void onClick(View view) {
                delete();
            }
        });

        read();
    }

    private void create() {
        final Dialog dialog = new Dialog(MainActivity.this);
        dialog.requestWindowFeature(Window.FEATURE_NO_TITLE);
        dialog.setContentView(R.layout.table_dialog);
        final EditText etName = (EditText) dialog.findViewById(R.id.etName);
        final EditText etAge = (EditText) dialog.findViewById(R.id.etAge);
        Button btnSave = (Button) dialog.findViewById(R.id.btnSave);
        btnSave.setOnClickListener(new View.OnClickListener() {
            @Override
            public void onClick(View view) {
                realm.executeTransaction(new Realm.Transaction() {
                    @Override
                    public void execute(Realm realm) {
                        int personCount;
                        //PrimaryKey增加
                        try {
                            personCount = realm.where(Person.class).max("id").intValue() + 1;
                        } catch (Exception e) {
                            personCount = 1; //從1開始
                        }
                        Log.i("personCount", personCount + "");
                        // 人 Table
                        Person personC = realm.createObject(Person.class, personCount);
                        personC.setName(etName.getText().toString());   // 輸入姓名
                        personC.setAge(Integer.parseInt(etAge.getText().toString()));   //輸入年齡

                        /* 公司 Table 測試 */
//                        Company company1 = realm.createObject(Company.class);
//                        company1.setId(4);
//                        company1.setCompanyName("公司2");
//                        personC.getCompany().add(company1);
//
//                        Company company2 = realm.createObject(Company.class);
//                        company2.setId(5);
//                        company2.setCompanyName("公司3");
//                        personC.getCompany().add(company2);
//
//                        Company company3 = realm.createObject(Company.class);
//                        company3.setId(6);
//                        company3.setCompanyName("公司4");
//                        personC.getCompany().add(company3);

                        read();
                        dialog.dismiss();
                    }
                });
            }
        });

        dialog.show();
    }

    private void read() {
        /* 公司 Table 測試 */
//        RealmResults<Person> person = realm.where(Person.class).equalTo("company.companyName", "公司2").equalTo("company.companyName", "公司1").findAll();
        RealmResults<Person> person = realm.where(Person.class).findAll();
        String message = "";
        Log.i("person.size()",person.size()+"");
        for (int i = 0; i < person.size(); i++) {
            message += person.get(i).getName() + " - " + person.get(i).getAge() + "\n";
            /* 公司 Table 測試 */
//            Log.i("getCompany.size()",person.get(i).getCompany().size()+"");
//            for(int j = 0; j <person.get(i).getCompany().size();j++) {
//                message += person.get(i).getName() + " - " + person.get(i).getAge() + ":" + person.get(i).getCompany().get(j).getCompanyName() + "\n";
//            }
        }
        tvMessage.setText(message);
    }

    private void update() {
        final Dialog dialog = new Dialog(MainActivity.this);
        dialog.requestWindowFeature(Window.FEATURE_NO_TITLE);
        dialog.setContentView(R.layout.table_dialog);
        final EditText etName = (EditText) dialog.findViewById(R.id.etName);
        final EditText etAge = (EditText) dialog.findViewById(R.id.etAge);
        Button btnSave = (Button) dialog.findViewById(R.id.btnSave);
        btnSave.setOnClickListener(new View.OnClickListener() {
            @Override
            public void onClick(View view) {
                realm.executeTransaction(new Realm.Transaction() {
                    @Override
                    public void execute(Realm realm) {
                        //修改第一筆
                        Person person = realm.where(Person.class).equalTo("id", 1).findFirst();
                        person.setName(etName.getText().toString());
                        person.setAge(Integer.parseInt(etAge.getText().toString()));

                        read();
                        dialog.dismiss();
                    }
                });
            }
        });

        dialog.show();
    }

    private void delete() {
        final RealmResults<Person> results = realm.where(Person.class).findAll();
        realm.executeTransaction(new Realm.Transaction() {
            @Override
            public void execute(Realm realm) {
                //刪除某一筆
//                Person p = results.get(1);
//                p.deleteFromRealm();
                //刪除第一筆
//                results.deleteFirstFromRealm();
                //刪除最後一筆
//                results.deleteLastFromRealm();
                //刪除全部
                results.deleteAllFromRealm();
            }
        });
        read();
    }

}

6.Person.java
package com.terryyamg.realmtest;


import io.realm.RealmList;
import io.realm.RealmObject;
import io.realm.annotations.PrimaryKey;

public class Person extends RealmObject{

    @PrimaryKey
    private int id;

    private String name;
    private int age;
    private RealmList<Company> company;

    public void setId(int id){
        this.id = id;
    }

    public int getId(){
        return id;
    }

    public void setName(String name){
        this.name = name;
    }

    public String getName(){
        return name;
    }

    public void setAge(int age){
        this.age = age;
    }

    public int getAge(){
        return age;
    }

    public void setCompany(RealmList<Company> company){
        this.company = company;
    }

    public RealmList<Company> getCompany(){
        return company;
    }

}

7.Company.java
package com.terryyamg.realmtest;


import io.realm.RealmObject;

public class Company extends RealmObject{

    private int id;

    private String companyName;

    public void setId(int id){
        this.id = id;
    }

    public int getId(){
        return id;
    }

    public void setCompanyName(String companyName){
        this.companyName = companyName;
    }

    public String getCompanyName(){
        return companyName;
    }

}

8./res/layout/activity_main.xml


9./res/layout/content_main.xml


10./res/layout/table_dialog.xml


參考資料:
https://realm.io/docs/java/latest/#getting-started
檔案下載:
https://github.com/terryyamg/RealmTest

2016年9月4日 星期日

Android Activity Animation 頁面 動畫

頁面Activity與Dialog移動動畫效果

1.在res下建立anim資料夾

2.在anim建立left_1.xml, left_2.xml, right_1.xml, right_2.xml, up_1.xml, down_1.xml檔案
分別為向左移動,向右移動,向上移動與向下移動

3.left_1.xml


left_2.xml


right_1.xml


right_2.xml


up_1.xml


down_1.xml


4.Dialog需要在value/styles.xml加入
    
5.3個layout頁面
res/layout/activity_main.xml


res/layout/activity_next.xml


res/layout/dialog_layout.xml


6.MainActivity.java
package com.terryyamg.activityanimationtest;

import android.app.Dialog;
import android.content.Intent;
import android.os.Bundle;
import android.support.v7.app.AppCompatActivity;
import android.util.Log;
import android.view.View;
import android.widget.Button;

public class MainActivity extends AppCompatActivity {

    @Override
    protected void onCreate(Bundle savedInstanceState) {
        super.onCreate(savedInstanceState);
        setContentView(R.layout.activity_main);
        Button btnNext = (Button) findViewById(R.id.btnNext);
        Button btnDialog = (Button) findViewById(R.id.btnDialog);
        btnNext.setOnClickListener(new View.OnClickListener() {
            @Override
            public void onClick(View view) {
                Intent intent = new Intent(MainActivity.this, NextActivity.class);
                startActivity(intent);
                overridePendingTransition(R.anim.right_1, R.anim.right_2);
            }
        });

        btnDialog.setOnClickListener(new View.OnClickListener() {
            @Override
            public void onClick(View view) {
                final Dialog dialog = new Dialog(MainActivity.this);
                dialog.setContentView(R.layout.dialog_layout);
                dialog.getWindow().getAttributes().windowAnimations = R.style.DialogAnimation;
                Button btnClose = (Button) dialog.findViewById(R.id.btnClose);
                btnClose.setOnClickListener(new View.OnClickListener() {
                    @Override
                    public void onClick(View view) {
                        dialog.dismiss();
                    }
                });
                dialog.show();
            }
        });


    }
}

NextActivity.java
package com.terryyamg.activityanimationtest;

import android.support.v7.app.AppCompatActivity;
import android.os.Bundle;
import android.util.Log;

public class NextActivity extends AppCompatActivity {

    @Override
    protected void onCreate(Bundle savedInstanceState) {
        super.onCreate(savedInstanceState);
        setContentView(R.layout.activity_next);
    }

    @Override
    public void onBackPressed() {
        super.onBackPressed();
        overridePendingTransition(R.anim.left_1, R.anim.left_2);
    }

}


檔案下載:
 https://github.com/terryyamg/ActivityAnimationTest
參考來源:
http://stackoverflow.com/questions/26431017/how-to-achieve-right-to-left-animation-to-start-the-activity
http://android-er.blogspot.tw/2012/07/dialog-animation-using-windowanimations.html

2016年7月26日 星期二

Android Transitions Scene 動態UI

Android的api: android.transition 提供基本的UI動畫 Min Sdk Version: API 21: Android 5.0 (Lollipop) -才有Slide,Explode...
1.activity_main.xml


2.scene2.xml


3.MainActivity.java
package com.terryyamg.transitionstest;

import android.os.Bundle;
import android.support.v7.app.AppCompatActivity;
import android.transition.Explode;
import android.transition.Scene;
import android.transition.Slide;
import android.transition.TransitionManager;
import android.util.Log;
import android.view.View;
import android.view.ViewGroup;
import android.widget.Button;
import android.widget.TextView;


public class MainActivity extends AppCompatActivity {
    private ViewGroup transitionsContainer;
    private Scene scene1, scene2;
    private Button btnShowBottomText, btnSlide;
    private TextView tv1;

    @Override
    protected void onCreate(Bundle savedInstanceState) {
        super.onCreate(savedInstanceState);
        setContentView(R.layout.activity_main);

        transitionsContainer = (ViewGroup) findViewById(R.id.transitions_container);
        scene1 = Scene.getSceneForLayout(transitionsContainer, R.layout.activity_main, this); //初始畫面
        scene2 = Scene.getSceneForLayout(transitionsContainer, R.layout.scene2, this); //第二畫面
        setting();

    }

    private void setting() {
        btnShowBottomText = (Button) transitionsContainer.findViewById(R.id.btnShowBottomText);
        tv1 = (TextView) transitionsContainer.findViewById(R.id.tv1);
        btnSlide = (Button) transitionsContainer.findViewById(R.id.btnSlide);
    }

    public void showBottomText(View view) {
        Log.i("show", "showBottomText");
        TransitionManager.beginDelayedTransition(transitionsContainer); //預設 new Fade()
        toggleVisibility(tv1);
    }

    public void slide(View view) {
        Log.i("show", "slide");
        TransitionManager.beginDelayedTransition(transitionsContainer, new Slide()); //滑動 ex:Slide(Gravity.RIGHT)..
        toggleVisibility(btnShowBottomText);
    }

    public void explode(View view) {
        Log.i("show", "explode");
        TransitionManager.beginDelayedTransition(transitionsContainer, new Explode()); //爆炸 隨意方向
        toggleVisibility(btnShowBottomText, btnSlide);
    }

    public void goToScene1(View view) {
        TransitionManager.go(scene1); //回到初始頁面
        setting();
    }

    public void goToScene2(View view) {
        TransitionManager.go(scene2); //前往第二頁面
        setting();
    }

    private static void toggleVisibility(View... views) {
        for (View view : views) {
            boolean isVisible = view.getVisibility() == View.VISIBLE;
            view.setVisibility(isVisible ? View.GONE : View.VISIBLE); //隱藏或顯示
        }
    }

}


檔案下載:
https://github.com/terryyamg/TransitionsTest
參考連結:
http://www.androiddesignpatterns.com/2014/12/activity-fragment-transitions-in-android-lollipop-part1.html
https://possiblemobile.com/2013/11/new-transitions-framework/
http://www.techotopia.com/index.php/Implementing_Android_Scene_Transitions_%E2%80%93_A_Tutorial

2016年6月12日 星期日

Android WearableListView 手錶 列表

建立Android手錶列表清單(圖+文字)

1.建立一個空白手錶專案
2.修改/res/layout/rect_activity_main.xml
<?xml version="1.0" encoding="utf-8"?>
<LinearLayout xmlns:android="http://schemas.android.com/apk/res/android"
    xmlns:tools="http://schemas.android.com/tools"
    android:layout_width="match_parent"
    android:layout_height="match_parent"
    android:background="#FFFFFF"
    android:orientation="vertical"
    tools:context="com.terryyamg.wearablelistviewtest.MainActivity"
    tools:deviceIds="wear_square">

    <android.support.wearable.view.WearableListView
        android:id="@+id/wearable_list"
        android:layout_width="match_parent"
        android:layout_height="match_parent"></android.support.wearable.view.WearableListView>

</LinearLayout>
3.修改/res/layout/round_activity_main.xml
<?xml version="1.0" encoding="utf-8"?>
<RelativeLayout xmlns:android="http://schemas.android.com/apk/res/android"
    xmlns:tools="http://schemas.android.com/tools"
    android:layout_width="match_parent"
    android:layout_height="match_parent"
    android:background="#FFFFFF"
    tools:context="com.terryyamg.wearablelistviewtest.MainActivity"
    tools:deviceIds="wear_round">

    <android.support.wearable.view.WearableListView
        android:id="@+id/wearable_list"
        android:layout_width="match_parent"
        android:layout_height="match_parent"></android.support.wearable.view.WearableListView>

</RelativeLayout>
4.建立/res/layout/list_item.xml
<com.terryyamg.wearablelistviewtest.WearableListItemLayout
    xmlns:android="http://schemas.android.com/apk/res/android"
    android:layout_width="match_parent"
    android:layout_height="80dp"
    android:gravity="center_vertical">

    <android.support.wearable.view.CircledImageView
        android:id="@+id/iv"
        android:layout_width="50dip"
        android:layout_height="50dip"
        android:layout_gravity="center_vertical"
        android:layout_margin="20dp"></android.support.wearable.view.CircledImageView>

    <TextView
        android:id="@+id/tv"
        android:layout_width="wrap_content"
        android:layout_height="match_parent"
        android:layout_marginRight="16dp"
        android:fontFamily="sans-serif-condensed-light"
        android:gravity="center_vertical|left"
        android:lineSpacingExtra="-4sp"
        android:textColor="#000000"
        android:textSize="16sp"></TextView>
</com.terryyamg.wearablelistviewtest.WearableListItemLayout>
5.新增WearableListItemLayout.java
package com.terryyamg.wearablelistviewtest;

import android.content.Context;
import android.support.wearable.view.CircledImageView;
import android.support.wearable.view.WearableListView;
import android.util.AttributeSet;
import android.widget.LinearLayout;
import android.widget.TextView;

public class WearableListItemLayout extends LinearLayout
        implements WearableListView.OnCenterProximityListener {

    private CircledImageView mImageView;
    private TextView mTextView;

    public WearableListItemLayout(Context context) {
        this(context, null);
    }

    public WearableListItemLayout(Context context, AttributeSet attrs) {
        this(context, attrs, 0);
    }

    public WearableListItemLayout(Context context, AttributeSet attrs,
                                  int defStyle) {
        super(context, attrs, defStyle);

    }

    // Get references to the icon and text in the item layout definition
    @Override
    protected void onFinishInflate() {
        super.onFinishInflate();
        // These are defined in the layout file for list items
        // (see next section)
        mImageView = (CircledImageView) findViewById(R.id.iv);
        mTextView = (TextView) findViewById(R.id.tv);
    }

    @Override
    public void onCenterPosition(boolean animate) {
        //在中間
        mImageView.setScaleX(1f);
        mImageView.setScaleY(1f);
        mTextView.setAlpha(1f);
    }

    @Override
    public void onNonCenterPosition(boolean animate) {
        //其他部分 圖縮小 文字透明一半
        mImageView.setScaleX(0.8f);
        mImageView.setScaleY(0.8f);
        mTextView.setAlpha(0.5f);
    }
}
6.新增MyAdapter.java
package com.terryyamg.wearablelistviewtest;

import android.content.Context;
import android.support.wearable.view.CircledImageView;
import android.support.wearable.view.WearableListView;
import android.view.LayoutInflater;
import android.view.View;
import android.view.ViewGroup;
import android.widget.TextView;

public class MyAdapter extends WearableListView.Adapter {
    private int[] mImage;
    private String[] mDataset;
    private final Context mContext;
    private final LayoutInflater mInflater;

    // Provide a suitable constructor (depends on the kind of dataset)
    public MyAdapter(Context context,int[] imageData, String[] dataset) {
        mContext = context;
        mInflater = LayoutInflater.from(context);
        mImage = imageData;
        mDataset = dataset;
    }

    // Provide a reference to the type of views you're using
    public static class ItemViewHolder extends WearableListView.ViewHolder {
        private CircledImageView imageView;
        private TextView textView;

        public ItemViewHolder(View itemView) {
            super(itemView);
            // find the text view within the custom item's layout
            imageView = (CircledImageView) itemView.findViewById(R.id.iv);
            textView = (TextView) itemView.findViewById(R.id.tv);
        }
    }

    // Create new views for list items
    // (invoked by the WearableListView's layout manager)
    @Override
    public WearableListView.ViewHolder onCreateViewHolder(ViewGroup parent,
                                                          int viewType) {
        // 對應list_item layout
        return new ItemViewHolder(mInflater.inflate(R.layout.list_item, null));
    }

    // Replace the contents of a list item
    // Instead of creating new views, the list tries to recycle existing ones
    // (invoked by the WearableListView's layout manager)
    @Override
    public void onBindViewHolder(WearableListView.ViewHolder holder,
                                 int position) {
        // retrieve the text view
        ItemViewHolder itemHolder = (ItemViewHolder) holder;
        CircledImageView iv = itemHolder.imageView;
        TextView view = itemHolder.textView;
        // 放入圖片、文字
        iv.setImageResource(mImage[position]);
        view.setText(mDataset[position]);
        // 設定tag id
        holder.itemView.setTag(position);
    }

    // Return the size of your dataset
    // (invoked by the WearableListView's layout manager)
    @Override
    public int getItemCount() {
        return mDataset.length;
    }
}

7.放入三張圖片(google.png,facebook.png,twitter.png)在/res/drawable/

8.MainActivity.java
package com.terryyamg.wearablelistviewtest;

import android.app.Activity;
import android.os.Bundle;
import android.support.wearable.view.WatchViewStub;
import android.support.wearable.view.WearableListView;
import android.widget.Toast;

public class MainActivity extends Activity {

    private int[] ivItems;
    private String[] tvItems;

    @Override
    protected void onCreate(Bundle savedInstanceState) {
        super.onCreate(savedInstanceState);
        setContentView(R.layout.activity_main);

        ivItems = new int[]{R.drawable.google, R.drawable.facebook, R.drawable.twitter}; //圖
        tvItems = new String[]{"Google", "Facebook", "Twitter"}; //文字

        final WatchViewStub stub = (WatchViewStub) findViewById(R.id.watch_view_stub);
        stub.setOnLayoutInflatedListener(new WatchViewStub.OnLayoutInflatedListener() {
            @Override
            public void onLayoutInflated(WatchViewStub stub) {
                // Get the list component from the layout of the activity
                WearableListView listView =
                        (WearableListView) stub.findViewById(R.id.wearable_list);

                // Assign an adapter to the list
                listView.setAdapter(new MyAdapter(MainActivity.this, ivItems, tvItems));
                listView.setClickListener(new WearableListView.ClickListener() {
                    @Override
                    public void onClick(WearableListView.ViewHolder viewHolder) {
                        Integer tag = (Integer) viewHolder.itemView.getTag();
                        Toast.makeText(MainActivity.this,tvItems[tag],Toast.LENGTH_SHORT).show();
                    }

                    @Override
                    public void onTopEmptyRegionClick() {

                    }
                });
            }
        });
    }
}

檔案下載:
https://github.com/terryyamg/WearableListViewTest
參考來源:
https://developer.android.com/training/wearables/ui/lists.html
http://www.learnandroidwear.com/sample-1/
https://gist.github.com/PomepuyN/c30760eaee1e58fdd8fa

2016年6月7日 星期二

Android Wear 穿帶手錶 測試 APP 移除

由於在穿戴手錶上測試App,穿戴式手表無法自己移除App
須借由adb.exe進行移除

1.找到android-sdk -> platform-tools

2.下adb devices指令找到目前連結的裝置ID

3.下 adb -s [裝置id] uninstall [包裹名稱]

4.完成出現success
 

參考連結:
http://stackoverflow.com/questions/24687375/uninstall-android-wear-app-from-real-device

2016年3月17日 星期四

Android RecognizerIntent TextToSpeech 跟Android對話

先說關鍵字(ok),Android說出對應的關鍵字(google)

1./res/layout/activity_main.xml


2.MainActivity.java
package com.terryyamg.voicecontroltest;

import android.app.Activity;
import android.content.Intent;
import android.os.Build;
import android.os.Bundle;
import android.speech.RecognizerIntent;
import android.speech.tts.TextToSpeech;
import android.view.View;
import android.widget.ArrayAdapter;
import android.widget.Button;
import android.widget.ListView;
import android.widget.Toast;

import java.util.ArrayList;
import java.util.Locale;

public class MainActivity extends Activity {

    public static final int VOICE_RECOGNITION_REQUEST_CODE = 9527; //對應用數字

    private ListView lvSpeak;
    private TextToSpeech toSpeech;

    @Override
    public void onCreate(Bundle savedInstanceState) {
        super.onCreate(savedInstanceState);
        setContentView(R.layout.activity_main);

        Button btMessage = (Button) findViewById(R.id.btMessage);
        lvSpeak = (ListView) findViewById(R.id.lvSpeak);
        showMic(); //顯示麥克風收音

        //TextToSpeech 初始化
        toSpeech=new TextToSpeech(getApplicationContext(), new TextToSpeech.OnInitListener() {
            @Override
            public void onInit(int status) {
                if(status != TextToSpeech.ERROR) {
                    toSpeech.setLanguage(Locale.US);
                }
            }
        });

        //再說一次
        btMessage.setOnClickListener(new View.OnClickListener() {
            @Override
            public void onClick(View v) {
                showMic();
            }
        });

    }

    //顯示麥克風收音
    private void showMic(){
        Intent intent = new Intent(RecognizerIntent.ACTION_RECOGNIZE_SPEECH);
        intent.putExtra(RecognizerIntent.EXTRA_LANGUAGE_MODEL,
                RecognizerIntent.LANGUAGE_MODEL_FREE_FORM);
        intent.putExtra(RecognizerIntent.EXTRA_PROMPT,
                "Say OK!");
        startActivityForResult(intent, VOICE_RECOGNITION_REQUEST_CODE);
    }

    @Override
    public void onActivityResult(int requestCode, int resultCode, Intent data) {
        super.onActivityResult(requestCode, resultCode, data);

        if (requestCode == VOICE_RECOGNITION_REQUEST_CODE && resultCode == RESULT_OK) {

            ArrayList matches = data.getStringArrayListExtra(RecognizerIntent.EXTRA_RESULTS);
            lvSpeak.setAdapter(new ArrayAdapter(this, android.R.layout.simple_list_item_1, matches)); //列出辨識出的句子

            if (matches.contains("OK")) { //比對句子
                //Android 說 google
                if (Build.VERSION.SDK_INT >= Build.VERSION_CODES.LOLLIPOP) {
                    String utteranceId=this.hashCode() + "";
                    toSpeech.speak("google", TextToSpeech.QUEUE_FLUSH, null, utteranceId);
                } else {
                    toSpeech.speak("google", TextToSpeech.QUEUE_FLUSH, null);
                }

            }else{
                Toast.makeText(this,"查無此句,請重試",Toast.LENGTH_SHORT).show();
            }
        }
    }

}
1


檔案下載:
https://github.com/terryyamg/VoiceControlTest
參考連結:
http://stackoverflow.com/questions/11798337/how-to-voice-commands-into-an-android-application
http://www.tutorialspoint.com/android/android_text_to_speech.htm
http://stackoverflow.com/questions/27968146/texttospeech-with-api-21

2016年3月15日 星期二

Android Google Analytics V4 快速使用

使用Google Analytics來觀看app使用情形

1.先前往https://www.google.com/analytics/web/#home/
登入Google帳號,申請一個專案,就會得到一組序號
長這樣: UA-75136xxx-1

2.這裡IDE用Android studio,在build.gradle(Module:app)加入
compile 'com.google.android.gms:play-services-analytics:8.4.0'

3.建立一個app,在res資料夾下建立一個xml資料夾
建立app_tracker.xml檔案,位置/res/xml/app_tracker.xml


    300

    
    true

    
    UA-75136xxx-1

    100.0

    true


3.建立AnalyticsTrackers.java
package com.terryyamg.analyticstest;

import android.content.Context;

import com.google.android.gms.analytics.GoogleAnalytics;
import com.google.android.gms.analytics.Tracker;

import java.util.HashMap;
import java.util.Map;

/**
 * A collection of Google Analytics trackers. Fetch the tracker you need using
 * {@code AnalyticsTrackers.getInstance().get(...)}
 * <p/>
 * This code was generated by Android Studio but can be safely modified by
 * hand at this point.
 * <p/>
 * TODO: Call {@link #initialize(Context)} from an entry point in your app
 * before using this!
 */
public final class AnalyticsTrackers {

    public enum Target {
        APP,
        // Add more trackers here if you need, and update the code in #get(Target) below
    }

    private static AnalyticsTrackers sInstance;

    public static synchronized void initialize(Context context) {
        if (sInstance != null) {
            throw new IllegalStateException("Extra call to initialize analytics trackers");
        }

        sInstance = new AnalyticsTrackers(context);
    }

    public static synchronized AnalyticsTrackers getInstance() {
        if (sInstance == null) {
            throw new IllegalStateException("Call initialize() before getInstance()");
        }

        return sInstance;
    }

    private final Map<Target, Tracker> mTrackers = new HashMap<Target, Tracker>();
    private final Context mContext;

    /**
     * Don't instantiate directly - use {@link #getInstance()} instead.
     */
    private AnalyticsTrackers(Context context) {
        mContext = context.getApplicationContext();
    }

    public synchronized Tracker get(Target target) {
        if (!mTrackers.containsKey(target)) {
            Tracker tracker;
            switch (target) {
                case APP:
                    tracker = GoogleAnalytics.getInstance(mContext).newTracker(R.xml.app_tracker);
                    break;
                default:
                    throw new IllegalArgumentException("Unhandled analytics target " + target);
            }
            mTrackers.put(target, tracker);
        }

        return mTrackers.get(target);
    }
}
4.建立MyApplication.java
package com.terryyamg.analyticstest;

import android.app.Application;

import com.google.android.gms.analytics.GoogleAnalytics;
import com.google.android.gms.analytics.HitBuilders;
import com.google.android.gms.analytics.StandardExceptionParser;
import com.google.android.gms.analytics.Tracker;

public class MyApplication extends Application {
    public static final String TAG = MyApplication.class
            .getSimpleName();

    private static MyApplication mInstance;

    @Override
    public void onCreate() {
        super.onCreate();
        mInstance = this;

        AnalyticsTrackers.initialize(this);
        AnalyticsTrackers.getInstance().get(AnalyticsTrackers.Target.APP);
    }

    public static synchronized MyApplication getInstance() {
        return mInstance;
    }

    public synchronized Tracker getGoogleAnalyticsTracker() {
        AnalyticsTrackers analyticsTrackers = AnalyticsTrackers.getInstance();
        return analyticsTrackers.get(AnalyticsTrackers.Target.APP);
    }

    /***
     * Tracking screen view
     *
     * @param screenName screen name to be displayed on GA dashboard
     */
    public void trackScreenView(String screenName) {
        Tracker t = getGoogleAnalyticsTracker();

        // Set screen name.
        t.setScreenName(screenName);

        // Send a screen view.
        t.send(new HitBuilders.ScreenViewBuilder().build());

        GoogleAnalytics.getInstance(this).dispatchLocalHits();
    }

    /***
     * Tracking exception
     *
     * @param e exception to be tracked
     */
    public void trackException(Exception e) {
        if (e != null) {
            Tracker t = getGoogleAnalyticsTracker();

            t.send(new HitBuilders.ExceptionBuilder()
                            .setDescription(
                                    new StandardExceptionParser(this, null)
                                            .getDescription(Thread.currentThread().getName(), e))
                            .setFatal(false)
                            .build()
            );
        }
    }

    /***
     * Tracking event
     *
     * @param category event category
     * @param action   action of the event
     * @param label    label
     */
    public void trackEvent(String category, String action, String label) {
        Tracker t = getGoogleAnalyticsTracker();

        // Build and send an Event.
        t.send(new HitBuilders.EventBuilder().setCategory(category).setAction(action).setLabel(label).build());
    }

}
5.修改AndroidManifest.xml 加入網路權限
android.permission.INTERNET
android.permission.ACCESS_NETWORK_STATE
在application加入android:name=".MyApplication"


6.基本上到這邊就完成了,可以在https://analytics.google.com/analytics/web/看到
 7.加入異常或當機狀態,在/res/layout/activity_main.xml加個Button


8.MainActivity.java
package com.terryyamg.analyticstest;

import android.os.Bundle;
import android.support.v7.app.AppCompatActivity;
import android.util.Log;
import android.view.View;
import android.widget.Button;

public class MainActivity extends AppCompatActivity {

    @Override
    protected void onCreate(Bundle savedInstanceState) {
        super.onCreate(savedInstanceState);
        setContentView(R.layout.activity_main);

        Button btCrash = (Button) findViewById(R.id.btCrash);
        assert btCrash != null;
        btCrash.setOnClickListener(new View.OnClickListener() {
            @Override
            public void onClick(View v) {
                try{
                    String name = null;
                    if (name.equals("test")){

                    }
                }catch (Exception e){
                    MyApplication.getInstance().trackException(e); //紀錄在Google Analytics裡
                    Log.i("NullPointerException",e+"");
                }
                //註解掉try catch會直接crash,也會紀錄在Google Analytics裡面
            }
        });
    }
}

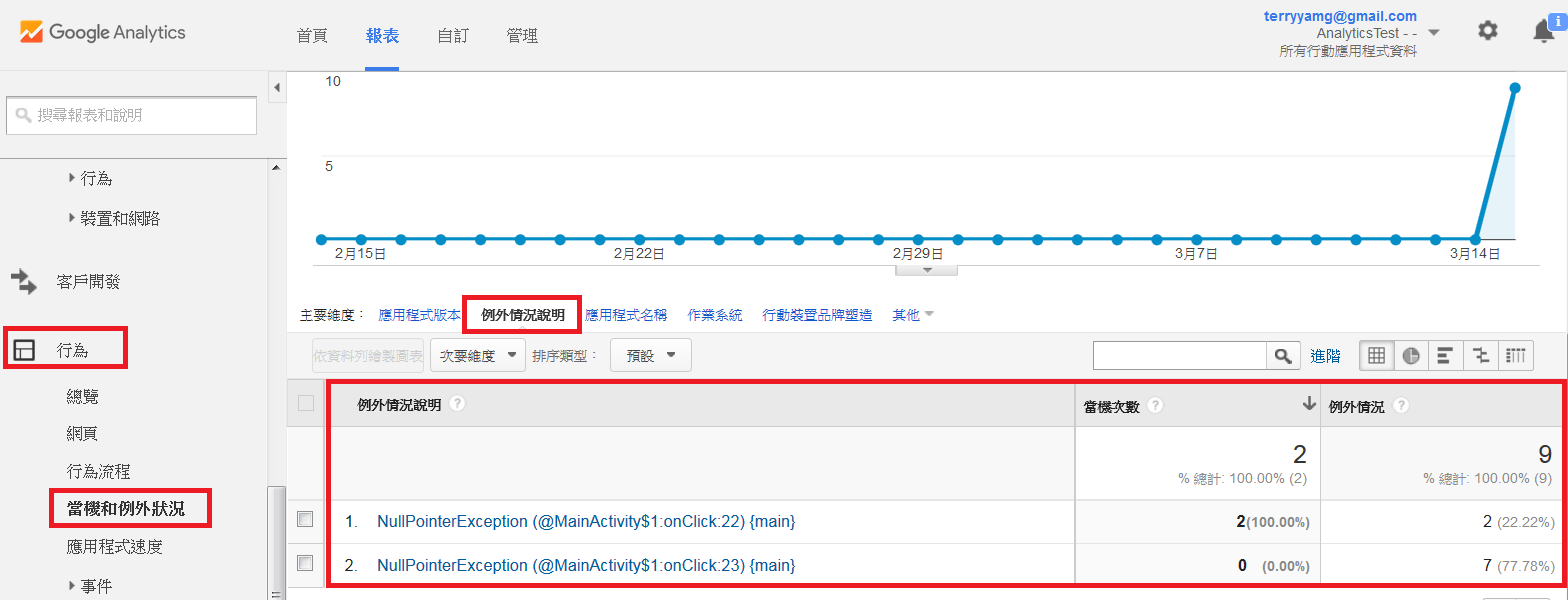
當機與例外狀況要等約一天才會出現

其餘還有其他功用,可以參考http://www.androidhive.info/2015/08/android-integrating-google-analytics-v4/

檔案下載:
 https://github.com/terryyamg/AnalyticsTest
參考連結:
http://www.androidhive.info/2015/08/android-integrating-google-analytics-v4/

2016年3月7日 星期一

Android RecyclerView

替代ListView方案 RecyclerView

1.在build.gradle(Module:app)添加compile 'com.android.support:recyclerview-v7:+'
apply plugin: 'com.android.application'

android {
    compileSdkVersion 23
    buildToolsVersion "23.0.1"
    defaultConfig {
        applicationId "com.terryyamg.recyclerviewtest"
        minSdkVersion 17
        targetSdkVersion 21
        versionCode 1
        versionName "1.0"
    }
    buildTypes {
        release {
            minifyEnabled false
            proguardFiles getDefaultProguardFile('proguard-android.txt'), 'proguard-rules.pro'
        }
    }
    productFlavors {
    }
}

dependencies {
    compile fileTree(include: ['*.jar'], dir: 'libs')
    testCompile 'junit:junit:4.12'
    compile 'com.android.support:appcompat-v7:23.2.0'
    compile 'com.android.support:recyclerview-v7:+'
}


2./res/layout/activity_main.xml


3.新增項目的layout /res/layout/item.xml
點擊效果
android:clickable="true"
android:background="?android:attr/selectableItemBackground"


4.新增分隔線class檔案 DividerItemDecoration.java
package com.terryyamg.recyclerviewtest;

import android.content.Context;
import android.content.res.TypedArray;
import android.graphics.Canvas;
import android.graphics.Rect;
import android.graphics.drawable.Drawable;
import android.support.v7.widget.LinearLayoutManager;
import android.support.v7.widget.RecyclerView;
import android.view.View;

public class DividerItemDecoration extends RecyclerView.ItemDecoration {

    private static final int[] ATTRS = new int[]{
            android.R.attr.listDivider
    };

    public static final int HORIZONTAL_LIST = LinearLayoutManager.HORIZONTAL;

    public static final int VERTICAL_LIST = LinearLayoutManager.VERTICAL;

    private Drawable mDivider;

    private int mOrientation;

    public DividerItemDecoration(Context context, int orientation) {
        final TypedArray a = context.obtainStyledAttributes(ATTRS);
        mDivider = a.getDrawable(0);
        a.recycle();
        setOrientation(orientation);
    }

    public void setOrientation(int orientation) {
        if (orientation != HORIZONTAL_LIST && orientation != VERTICAL_LIST) {
            throw new IllegalArgumentException("invalid orientation");
        }
        mOrientation = orientation;
    }

    @Override
    public void onDrawOver(Canvas c, RecyclerView parent, RecyclerView.State state) {
        if (mOrientation == VERTICAL_LIST) {
            drawVertical(c, parent);
        } else {
            drawHorizontal(c, parent);
        }
    }

    public void drawVertical(Canvas c, RecyclerView parent) {
        final int left = parent.getPaddingLeft();
        final int right = parent.getWidth() - parent.getPaddingRight();

        final int childCount = parent.getChildCount();
        for (int i = 0; i < childCount; i++) {
            final View child = parent.getChildAt(i);
            final RecyclerView.LayoutParams params = (RecyclerView.LayoutParams) child
                    .getLayoutParams();
            final int top = child.getBottom() + params.bottomMargin;
            final int bottom = top + mDivider.getIntrinsicHeight();
            mDivider.setBounds(left, top, right, bottom);
            mDivider.draw(c);
        }
    }

    public void drawHorizontal(Canvas c, RecyclerView parent) {
        final int top = parent.getPaddingTop();
        final int bottom = parent.getHeight() - parent.getPaddingBottom();

        final int childCount = parent.getChildCount();
        for (int i = 0; i < childCount; i++) {
            final View child = parent.getChildAt(i);
            final RecyclerView.LayoutParams params = (RecyclerView.LayoutParams) child
                    .getLayoutParams();
            final int left = child.getRight() + params.rightMargin;
            final int right = left + mDivider.getIntrinsicHeight();
            mDivider.setBounds(left, top, right, bottom);
            mDivider.draw(c);
        }
    }

    @Override
    public void getItemOffsets(Rect outRect, View view, RecyclerView parent, RecyclerView.State state) {
        if (mOrientation == VERTICAL_LIST) {
            outRect.set(0, 0, 0, mDivider.getIntrinsicHeight());
        } else {
            outRect.set(0, 0, mDivider.getIntrinsicWidth(), 0);
        }
    }
}


5.新增點擊class檔案 RecyclerTouchListener.java
package com.terryyamg.recyclerviewtest;

import android.content.Context;
import android.support.v7.widget.RecyclerView;
import android.view.GestureDetector;
import android.view.MotionEvent;
import android.view.View;

public class RecyclerTouchListener implements RecyclerView.OnItemTouchListener {

    private GestureDetector gestureDetector;
    private ClickListener clickListener;

    public interface ClickListener {
        void onClick(View view, int position);

        void onLongClick(View view, int position);
    }

    public RecyclerTouchListener(Context context, final RecyclerView recyclerView, final ClickListener clickListener) {
        this.clickListener = clickListener;
        gestureDetector = new GestureDetector(context, new GestureDetector.SimpleOnGestureListener() {
            @Override
            public boolean onSingleTapUp(MotionEvent e) {
                return true;
            }

            @Override
            public void onLongPress(MotionEvent e) {
                View child = recyclerView.findChildViewUnder(e.getX(), e.getY());
                if (child != null && clickListener != null) {
                    clickListener.onLongClick(child, recyclerView.getChildAdapterPosition(child));
                }
            }
        });
    }

    @Override
    public boolean onInterceptTouchEvent(RecyclerView rv, MotionEvent e) {

        View child = rv.findChildViewUnder(e.getX(), e.getY());
        if (child != null && clickListener != null && gestureDetector.onTouchEvent(e)) {
            clickListener.onClick(child, rv.getChildAdapterPosition(child));
        }
        return false;
    }

    @Override
    public void onTouchEvent(RecyclerView rv, MotionEvent e) {
    }

    @Override
    public void onRequestDisallowInterceptTouchEvent(boolean disallowIntercept) {

    }
}

6.主檔 MainActivity.java
package com.terryyamg.recyclerviewtest;

import android.os.Bundle;
import android.support.v7.app.AppCompatActivity;
import android.support.v7.widget.DefaultItemAnimator;
import android.support.v7.widget.LinearLayoutManager;
import android.support.v7.widget.RecyclerView;
import android.view.LayoutInflater;
import android.view.View;
import android.view.ViewGroup;
import android.widget.TextView;
import android.widget.Toast;

public class MainActivity extends AppCompatActivity {

    private String[] ss = {"no.01", "no.02", "no.03","no.04", "no.05", "no.06","no.07", "no.08", "no.09","no.10", "no.11", "no.12"};

    @Override
    protected void onCreate(Bundle savedInstanceState) {
        super.onCreate(savedInstanceState);
        setContentView(R.layout.activity_main);

        RecyclerView rv = (RecyclerView) findViewById(R.id.rv);
        MyAdapter adapter = new MyAdapter(ss);
        LinearLayoutManager lm = new LinearLayoutManager(this);
        rv.setLayoutManager(lm);
        rv.setHasFixedSize(true); //當RecyclerView大小沒改變時最佳化
        rv.setItemAnimator(new DefaultItemAnimator()); //預設動畫效果
        rv.addItemDecoration(new DividerItemDecoration(this, LinearLayoutManager.VERTICAL)); //分隔線
        rv.setAdapter(adapter);
        //監聽事件
        rv.addOnItemTouchListener(new RecyclerTouchListener(getApplicationContext(), rv, new RecyclerTouchListener.ClickListener() {
            @Override
            public void onClick(View view, int position) {
                Toast.makeText(MainActivity.this, ss[position],Toast.LENGTH_SHORT).show();
            }

            @Override
            public void onLongClick(View view, int position) {

            }
        }));
    }

    public class MyAdapter extends RecyclerView.Adapter<MyAdapter.MyViewHolder> {

        private String[] ss;

        public class MyViewHolder extends RecyclerView.ViewHolder {
            public TextView tv;

            public MyViewHolder(View view) {
                super(view);
                tv = (TextView) view.findViewById(R.id.tv);
            }
        }

        public MyAdapter(String[] ss) {
            this.ss = ss;
        }

        @Override
        public MyViewHolder onCreateViewHolder(ViewGroup parent, int viewType) {
            //設定item layout
            View itemView = LayoutInflater.from(parent.getContext()).inflate(R.layout.item, parent, false);

            return new MyViewHolder(itemView);
        }

        @Override
        public void onBindViewHolder(MyViewHolder holder, int position) {
            //放入資料
            holder.tv.setText(ss[position]);
        }

        @Override
        public int getItemCount() {
            //取得長度
            return ss.length;
        }
    }

}


檔案下載:
https://github.com/terryyamg/RecyclerViewTest
參考連結:
http://www.androidhive.info/2016/01/android-working-with-recycler-view/
https://developer.android.com/reference/android/support/v7/widget/RecyclerView.html#getChildPosition%28android.view.View%29

2016年3月2日 星期三

Android Splash Screen 新開啟畫面

前篇開啟app啟動畫面
http://terryyamg.blogspot.tw/2014/06/android-splashscreen.html
另一種方法

1.在 res/drawable/新增launch_screen.xml 上方加入android:opacity="opaque" 中間放入logo圖片並置中


2.在 res/values/styles.xml 新增一個AppTheme.Launcher
<resources>

    <!-- Base application theme. -->
    <style name="AppTheme" parent="Theme.AppCompat.Light.DarkActionBar">
        <!-- Customize your theme here. -->
        <item name="colorPrimary">@color/colorPrimary</item>
        <item name="colorPrimaryDark">@color/colorPrimaryDark</item>
        <item name="colorAccent">@color/colorAccent</item>
    </style>

    <style name="AppTheme.Launcher">
        <item name="android:windowBackground">@drawable/launch_screen</item>
    </style>

</resources>

3.在AndroidManifest.xml加入 android:theme="@style/AppTheme.Launcher"


4.最後MainActivity.java
package com.terryyamg.launchscreenstest;

import android.app.Activity;
import android.os.Bundle;

public class MainActivity extends Activity {

    @Override
    protected void onCreate(Bundle savedInstanceState) {
        setTheme(R.style.AppTheme); //加入此行
        super.onCreate(savedInstanceState);
        setContentView(R.layout.activity_main);
    }
}


檔案下載:
https://github.com/terryyamg/LaunchScreensTest
參考來源:
https://plus.google.com/+AndroidDevelopers/posts/Z1Wwainpjhd

2015年12月20日 星期日

Android Bluetooth Transfer Data 藍芽 傳送 檔案

藍芽傳送檔案,須先準備兩台並配對好藍芽
1.AndroidManifest.xml 加上權限


2./res/layout/activity_main.xml 放個Button


3.MainActivity.java
package com.terryyamg.bluetoothdatatransfertest;

import android.bluetooth.BluetoothAdapter;
import android.content.Intent;
import android.content.pm.PackageManager;
import android.content.pm.ResolveInfo;
import android.net.Uri;
import android.os.Bundle;
import android.os.Environment;
import android.support.v7.app.AppCompatActivity;
import android.view.View;
import android.widget.Button;
import android.widget.Toast;

import java.io.File;
import java.io.FileOutputStream;
import java.io.IOException;
import java.util.List;

public class MainActivity extends AppCompatActivity {

    private static final int DISCOVER_DURATION = 300;
    private static final int REQUEST_BLU = 1;

    @Override
    protected void onCreate(Bundle savedInstanceState) {
        super.onCreate(savedInstanceState);
        setContentView(R.layout.activity_main);
        Button btSend = (Button) findViewById(R.id.btSend);
        btSend.setOnClickListener(new View.OnClickListener() {
            @Override
            public void onClick(View v) {
                sendViaBluetooth(v);
            }
        });
    }

    public void sendViaBluetooth(View v) {

        BluetoothAdapter btAdapter = BluetoothAdapter.getDefaultAdapter();

        if (btAdapter == null) {
            Toast.makeText(this, "裝置沒有藍芽", Toast.LENGTH_LONG).show();
        } else {
            enableBluetooth();
        }
    }

    //啟動藍芽
    public void enableBluetooth() {

        Intent discoveryIntent = new Intent(BluetoothAdapter.ACTION_REQUEST_DISCOVERABLE);
        //開啟藍芽時間
        discoveryIntent.putExtra(BluetoothAdapter.EXTRA_DISCOVERABLE_DURATION, DISCOVER_DURATION);

        startActivityForResult(discoveryIntent, REQUEST_BLU);
    }

    @Override
    protected void onActivityResult(int requestCode, int resultCode, Intent data) {

        if (resultCode == DISCOVER_DURATION && requestCode == REQUEST_BLU) {

            Intent intent = new Intent();
            intent.setAction(Intent.ACTION_SEND);
            intent.setType("text/plain");//檔案類型
            File file = new File(Environment.getExternalStorageDirectory(), "BluetoothTest.txt"); //建立傳送檔案名稱

            String content = "Hello"; //文件內容
            try {
                FileOutputStream fop = new FileOutputStream(file);

                if (!file.exists()) { // 如果檔案不存在,建立檔案
                    file.createNewFile();
                }
                byte[] contentInBytes = content.getBytes();// 取的字串內容bytes
                fop.write(contentInBytes); // 輸出
                fop.flush();
                fop.close();
            } catch (IOException e) {
                e.printStackTrace();
            }
            intent.putExtra(Intent.EXTRA_STREAM, Uri.fromFile(file));

            PackageManager pm = getPackageManager();
            List<ResolveInfo> appsList = pm.queryIntentActivities(intent, 0);
            if (appsList.size() > 0) {
                String packageName = null;
                String className = null;
                boolean found = false;

                for (ResolveInfo info : appsList) {
                    packageName = info.activityInfo.packageName;
                    if (packageName.equals("com.android.bluetooth")) {
                        className = info.activityInfo.name;
                        found = true;
                        break;
                    }
                }

                if (!found) {
                    Toast.makeText(this, "沒有找到藍芽", Toast.LENGTH_LONG).show();
                } else {
                    intent.setClassName(packageName, className);
                    startActivity(intent);
                }
            }
        } else {
            Toast.makeText(this, "取消", Toast.LENGTH_LONG).show();
        }
    }
}


檔案下載:
 https://github.com/terryyamg/BluetoothDataTransferTest
參考連結:
https://www.youtube.com/watch?v=6hQ87u9v7SY