顯示具有 Customize 標籤的文章。 顯示所有文章

2017年7月1日 星期六

iOS Swift Custom View Xib 客製化 視窗

建立一個上下左右跑進來的視窗,使用xib客製化元件

1.建立一個xib檔案 File -> New -> File ... 選擇View
2.MyView.xib


a.建立 MyView.xib 並拉一個Label到視窗
b.選擇View
c.設定屬性Size:Freeform 其他None

3.建立MyView.Swift
//
//  MyView.swift
//  JumpViewTest
//
//  Created by Terry Yang on 2017/6/30.
//  Copyright © 2017年 terryyamg. All rights reserved.
//

import UIKit

class MyView: UIView {
    
    @IBOutlet weak var labCustom: UILabel!
    
    var view:UIView!
    
    // Label Inspectable
    @IBInspectable
    var mytitleLabelText: String? {
        get {
            return labCustom.text
        }
        set(mytitleLabelText) {
            labCustom.text = mytitleLabelText
        }
    }
    
    override init(frame: CGRect) {
        super.init(frame: frame)
        setup()
    }
    
    required init?(coder aDecoder: NSCoder) {
        super.init(coder: aDecoder)
        setup()
    }
    
    func setup() {
        view = loadViewFromNib()
        view.frame = bounds
        view.autoresizingMask = [
            UIViewAutoresizing.flexibleWidth,
            UIViewAutoresizing.flexibleHeight
        ]
        addSubview(view)
    }
    
    func loadViewFromNib() -> UIView {
        let bundle = Bundle(for: type(of: self))
        let nib = UINib(nibName: "MyView", bundle: bundle)
        let view = nib.instantiate(withOwner: self, options: nil)[0] as! UIView
        
        return view
    }
    
}

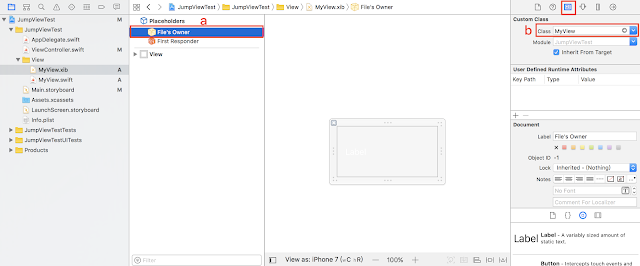
4.在MyView.xib

a.選擇File;s Owner
b.點擊Identity並選擇Class 對應到 MyView

5.連結Label到MyView.swift
6.於Main.storyboard建立四個按鈕

7.ViewController.swift


//
//  ViewController.swift
//  JumpViewTest
//
//  Created by Terry Yang on 2017/6/30.
//  Copyright © 2017年 terryyamg. All rights reserved.
//

import UIKit

class ViewController: UIViewController {
    
    var indexOfTop : Int    = 0
    var indexOfLeft : Int   = 0
    var indexOfRight : Int  = 0
    var indexOfBottom : Int = 0
    
    var topView : MyView?
    var leftView : MyView?
    var rightView : MyView?
    var bottomView : MyView?
    
    override func viewDidLoad() {
        super.viewDidLoad()
        // Do any additional setup after loading the view, typically from a nib.
        
    }
    
    override func didReceiveMemoryWarning() {
        super.didReceiveMemoryWarning()
        // Dispose of any resources that can be recreated.
    }
    
    //  Top 按鈕
    @IBAction func btnShowTop(_ sender: UIButton) {
        indexOfTop += 1
        
        if topView == nil {
            //建立客製化View視窗
            topView = MyView(frame: CGRect(x: 0, y: -150, width: UIScreen.main.bounds.size.width, height: 150)) //設定初始位置與大小
            topView?.backgroundColor = .red //背景顏色
            topView?.labCustom.text = "Oh! Top View" //顯示文字
            self.view.addSubview(topView!) //加入此視窗
        }
        
        if indexOfTop % 2 == 1 { //點擊展開視窗
            UIView.animate(withDuration: 0.5, animations: {
                self.topView?.frame.origin.y += 150
            }, completion: nil)
        } else { //點擊收起視窗
            UIView.animate(withDuration: 0.5, animations: {
                self.topView?.frame.origin.y -= 150
            }, completion: nil)
        }
    }
    
    // Left 按鈕
    @IBAction func btnShowLeft(_ sender: UIButton) {
        
        indexOfLeft += 1
        
        if leftView == nil {
            leftView = MyView(frame: CGRect(x: -150, y: 0, width: 150, height: UIScreen.main.bounds.size.height))
            leftView?.backgroundColor = .brown
            leftView?.labCustom.text = "It's Left"
            self.view.addSubview(leftView!)
        }
        
        if indexOfLeft % 2 == 1 {
            UIView.animate(withDuration: 0.5, animations: {
                self.leftView?.frame.origin.x += 150
            }, completion: nil)
        } else {
            UIView.animate(withDuration: 0.5, animations: {
                self.leftView?.frame.origin.x -= 150
            }, completion: nil)
        }
        
    }
    
    // Right 按鈕
    @IBAction func btnShowRight(_ sender: UIButton) {
        
        indexOfRight += 1
        
        if rightView == nil {
            rightView = MyView(frame: CGRect(x: view.frame.maxX, y: 0, width: 150, height: UIScreen.main.bounds.size.height))
            rightView?.backgroundColor = .green
            rightView?.labCustom.text = "It's Right"
            self.view.addSubview(rightView!)
        }
        
        if indexOfRight % 2 == 1 {
            UIView.animate(withDuration: 0.5, animations: {
                self.rightView?.frame.origin.x -= 150
            }, completion: nil)
        } else {
            UIView.animate(withDuration: 0.5, animations: {
                self.rightView?.frame.origin.x += 150
            }, completion: nil)
        }
        
    }
    
    // Bottom 按鈕
    @IBAction func btnShowBootom(_ sender: UIButton) {
        indexOfBottom += 1
        
        if bottomView == nil {
            bottomView = MyView(frame: CGRect(x: 0, y: view.frame.maxY, width: UIScreen.main.bounds.size.width, height: 150))
            bottomView?.backgroundColor = .black
            bottomView?.labCustom.text = "Hi! Bottom View"
            self.view.addSubview(bottomView!)
        }
        
        if indexOfBottom % 2 == 1 {
            UIView.animate(withDuration: 0.5, animations: {
                self.bottomView?.frame.origin.y -= 150
            }, completion: nil)
        } else {
            UIView.animate(withDuration: 0.5, animations: {
                self.bottomView?.frame.origin.y += 150
            }, completion: nil)
        }
    }
    
    
}


 檔案下載:
https://github.com/terryyamg/JumpViewTest
 參考連結:
https://stackoverflow.com/documentation/ios/1362/custom-uiviews-from-xib-files#t=201706280220545656796
https://www.youtube.com/watch?v=EBYdsYwoJVI&t=492s
https://www.youtube.com/watch?v=MMgfnrddOxY

2015年3月27日 星期五

Android Customize Dialog 客製化 自製化 跳出 對話框

自製跳出對畫框Dialog
1.主畫面res/layout/main.xml


2.建立跳出Dialog畫面res/layout/dialog.xml


3.Main.java
package tw.android;

import android.app.Activity;
import android.app.Dialog;
import android.content.Context;
import android.os.Bundle;
import android.view.View;
import android.view.View.OnClickListener;
import android.widget.Button;
import android.widget.EditText;
import android.widget.TextView;

public class Main extends Activity {
 
 final Context context = this;
 private Button btDialog,btConfirm;
 private TextView tvDialog;
 private EditText etDialog;
 private String message;
 
    /** Called when the activity is first created. */
    @Override
    public void onCreate(Bundle savedInstanceState) {
        super.onCreate(savedInstanceState);
        setContentView(R.layout.main);
        
        btDialog = (Button) findViewById(R.id.btDialog);
        
        tvDialog = (TextView) findViewById(R.id.tvDialog);
        
        btDialog.setOnClickListener(new OnClickListener() {

   public void onClick(View view) {

    final Dialog dialog = new Dialog(context);

    /*使用客製化layout*/
    dialog.setContentView(R.layout.dialog);
    dialog.setTitle("我出來啦");

    etDialog = (EditText) dialog.findViewById(R.id.etDialog); //客製化Dialog編輯文字
    btConfirm = (Button) dialog.findViewById(R.id.btConfirm); //客製化Dialog確認按鈕

    btConfirm.setOnClickListener(new OnClickListener() {
     public void onClick(View v) {
      message = etDialog.getText().toString(); //客製化Dialog輸入訊息的訊息
            tvDialog.setText(message); //顯示輸入訊息
      dialog.dismiss(); //關閉客製化Dialog
     }
    });

    dialog.show();
   }
  });
        
        
    }
}


檔案下載:
https://github.com/terryyamg/customDialogTest
參考來源:
http://examples.javacodegeeks.com/android/core/ui/dialog/android-custom-dialog-example/

2015年3月12日 星期四

Android TabHost Customize 頁籤 客製化 自製化

TabHost自行製作
1.主要layout檔/res/layout/main.xml


2.Main.java
import android.annotation.SuppressLint;
import android.app.Activity;
import android.content.Context;
import android.os.Bundle;
import android.view.LayoutInflater;
import android.view.View;
import android.widget.ImageView;
import android.widget.LinearLayout;
import android.widget.TabHost;
import android.widget.TabHost.TabContentFactory;
import android.widget.TabHost.TabSpec;
import android.widget.TextView;

public class Main extends Activity {
 private TabHost mTabHost;
 
 @Override
 public void onCreate(Bundle savedInstanceState) {
  super.onCreate(savedInstanceState);
  setContentView(R.layout.main);
  
  mTabHost = (TabHost) findViewById(android.R.id.tabhost);
  mTabHost.setup();
  
  LinearLayout tv1 = (LinearLayout) findViewById(R.id.tab1); //頁籤1內容
  LinearLayout tv2 = (LinearLayout) findViewById(R.id.tab2); //頁籤2內容
  LinearLayout tv3 = (LinearLayout) findViewById(R.id.tab3); //頁籤3內容
  
     setupTab(tv1, "Tab 1",1); //頁籤 (內容,標籤,圖id)
     setupTab(tv2, "Tab 2",1);
     setupTab(tv3, "Tab 3",1);
     
     mTabHost.setCurrentTab(2); //點選頁籤3
     mTabHost.setCurrentTab(1); //點選頁籤2
     mTabHost.setCurrentTab(0); //點選頁籤1
 }
 
 private void setupTab(final View view, final String tag,final Integer iconId) {
     View tabview = createTabView(mTabHost.getContext(), tag, iconId); //設定頁籤
     TabSpec setContent = mTabHost.newTabSpec(tag).setIndicator(tabview).setContent(new TabContentFactory() {
         public View createTabContent(String tag) {
             return view;
         }
     });
     mTabHost.addTab(setContent);
 }

 @SuppressLint("InflateParams")
 private static View createTabView(final Context context, final String text,final Integer iconId) {
     View view = LayoutInflater.from(context).inflate(R.layout.tabs_bg, null);
     ImageView iv = (ImageView) view.findViewById(R.id.icon); //顯示icon圖示
     TextView tv = (TextView) view.findViewById(R.id.tabsText); //顯示文字
        iv.setImageResource(iconId); //設定圖示
     tv.setText(text); //設定文字
     return view;
 }
}
3.layout頁籤背景 /res/layout/tabs_bg.xml


4.drawable背景檔-選擇器 /res/drawable/tab_bg_selector.xml


5.drawable背景檔-選中色彩 /res/drawable/tab_bg_selected.xml


6.drawable背景檔-沒選中色彩 /res/drawable/tab_bg_unselected.xml


7.drawable圖示檔-選擇器 /res/drawable/tab_icon_selector.xml
sport1,sport2為圖檔


8.drawable文字檔-選擇器 /res/drawable/tab_text_selector.xml


效果如圖


檔案位址:https://github.com/terryyamg/tabhost_customize
參考來源:http://stackoverflow.com/questions/17897351/how-to-customize-android-tabs-or-background-change

2014年11月3日 星期一

Android RatingBar Customize 自製 評分

Android內建評分星星系統,可自行製作圖案代替星星
1.activity_main.xml
android:numStars="5" ----- 總數量
android:rating="2.5" ----- 初始值
android:stepSize="0.5" " -----評分單位
style="?android:attr/ratingBarStyleIndicator" ----- 指標(無法拉動)
style="?android:attr/ratingBarStyleSmall" ----- 小指標
style="@style/foodRatingBar" ----- 自製圖案


2.在res -> value -> styles.xml檔案內加上

3.在res -> drawable-hdpi 建立三個檔案
food_ratingbar_full.xml
food_ratingbar_full_empty.xml
food_ratingbar_full_filled.xml
並將圖片

下載至drawable-hdpi此資料夾內
food_ratingbar_full.xml


food_ratingbar_full_empty.xml


food_ratingbar_full_filled.xml


4.MainActivity.java
public class MainActivity extends FragmentActivity {

 private RatingBar ratingBar4;
 private TextView txtRatingValue;
 @Override
 protected void onCreate(Bundle savedInstanceState) {
  super.onCreate(savedInstanceState);
  setContentView(R.layout.activity_main);
  addListenerOnRatingBar();
 }

 //滑動直接顯示分數
 public void addListenerOnRatingBar() {
   
  ratingBar4 = (RatingBar) findViewById(R.id.ratingBar4);
  txtRatingValue = (TextView) findViewById(R.id.txtRatingValue);
  
  //if rating value is changed,
  //display the current rating value in the result (textview) automatically
  ratingBar4.setOnRatingBarChangeListener(new OnRatingBarChangeListener() {
   public void onRatingChanged(RatingBar ratingBar, float rating,
    boolean fromUser) {
  
    txtRatingValue.setText(String.valueOf(rating));
  
   }
  });
   }
}


參考來源:
http://www.mkyong.com/android/android-rating-bar-example/
http://kozyr.zydako.net/2010/05/23/pretty-ratingbar/
https://github.com/kozyr/foody-memories