1.首先建立一個空白專案,建立完成後打開在app下的build.gradle檔案

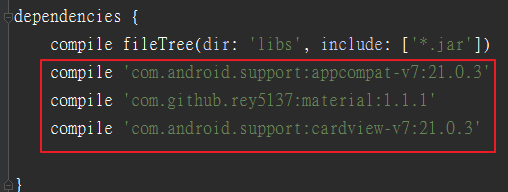
2.以https://github.com/rey5137/material UI 為例,在build.gradle檔案加入
compile 'com.android.support:appcompat-v7:21.0.3'
compile 'com.github.rey5137:material:1.1.1'
compile 'com.android.support:cardview-v7:21.0.3'
3.基本上在這裡點選Build -> Clear Project 就會下載匯入在你的專案裡

4.在專案點右鍵 -> Open Module Settings中的Dependencies裡可以看到匯入的lib

5.下載https://github.com/rey5137/material/archive/master.zip 拿裡面的demo檔來測試
位置在下載的資料夾material-master\app\src\main,在這裡先測試button原件
將material-master\app\src\main\res除了layout資料夾其他資料夾複製到你的專案底下 res的位置

6.在專案res/下建立layout資料夾,建立activity_main.xml,複製material-master\app\src\main\res\layout\fragment_button.xml裡的程式碼
7.建立MainActivity.java
import android.app.Activity;
import android.os.Bundle;
import android.view.View;

import com.rey.material.drawable.RippleDrawable;
import com.rey.material.widget.Button;
import com.rey.material.widget.FloatingActionButton;

public class MainActivity extends Activity {
    @Override
    protected void onCreate(Bundle savedInstanceState) {
        super.onCreate(savedInstanceState);
        setContentView(R.layout.activity_main);

        Button bt_flat = (Button) findViewById(R.id.button_bt_flat);
        Button bt_flat_color = (Button) findViewById(R.id.button_bt_flat_color);
        Button bt_flat_wave = (Button) findViewById(R.id.button_bt_flat_wave);
        Button bt_flat_wave_color = (Button) findViewById(R.id.button_bt_flat_wave_color);
        Button bt_raise = (Button) findViewById(R.id.button_bt_raise);
        Button bt_raise_color = (Button) findViewById(R.id.button_bt_raise_color);
        Button bt_raise_wave = (Button) findViewById(R.id.button_bt_raise_wave);
        Button bt_raise_wave_color = (Button) findViewById(R.id.button_bt_raise_wave_color);
        FloatingActionButton bt_float = (FloatingActionButton) findViewById(R.id.button_bt_float);
        FloatingActionButton bt_float_color = (FloatingActionButton) findViewById(R.id.button_bt_float_color);
        FloatingActionButton bt_float_wave = (FloatingActionButton) findViewById(R.id.button_bt_float_wave);
        FloatingActionButton bt_float_wave_color = (FloatingActionButton) findViewById(R.id.button_bt_float_wave_color);

        /*左邊正常速度*/
        View.OnClickListener listener = new View.OnClickListener() {

            @Override
            public void onClick(View v) {
                if (v instanceof FloatingActionButton) {
                    FloatingActionButton bt = (FloatingActionButton) v;
                    bt.setLineMorphingState((bt.getLineMorphingState() + 1) % 2, true);
                }

                System.out.println(v + " " + ((RippleDrawable) v.getBackground()).getDelayClickType());
            }
        };
        /*右邊DELAY速度*/
        View.OnClickListener listener_delay = new View.OnClickListener() {

            @Override
            public void onClick(View v) {
                if (v instanceof FloatingActionButton) {
                    FloatingActionButton bt = (FloatingActionButton) v;
                    bt.setLineMorphingState((bt.getLineMorphingState() + 1) % 2, true);
                }

                System.out.println(v + " " + ((RippleDrawable) v.getBackground()).getDelayClickType());
            }
        };

        /*監聽事件*/
        bt_flat.setOnClickListener(listener);
        bt_flat_wave.setOnClickListener(listener);
        bt_raise.setOnClickListener(listener);
        bt_raise_wave.setOnClickListener(listener);
        bt_float.setOnClickListener(listener);
        bt_float_wave.setOnClickListener(listener);

        bt_flat_color.setOnClickListener(listener_delay);
        bt_flat_wave_color.setOnClickListener(listener_delay);
        bt_raise_color.setOnClickListener(listener_delay);
        bt_raise_wave_color.setOnClickListener(listener_delay);
        bt_float_color.setOnClickListener(listener_delay);
        bt_float_wave_color.setOnClickListener(listener_delay);

    }

}
8.最後修改一下AndroidManifest.xml

檔案下載: https://github.com/terryyamg/ASLibTest
參考連結:https://github.com/rey5137/material
請問一下 有 eclipse版的 匯入 github嗎~! 感恩!!
回覆刪除不好意思,eclipse這部分我沒用過耶,不過還是建議將專案轉成Android Studio,比較多套件可用。
刪除好喔 我試試看~ 最近要做一個 漂亮一點的 UI介面~所以 一直再找參考資料 不懂的地方 還請多多指教~~3Q!!
刪除