2015年12月20日 星期日

Android Bluetooth Transfer Data 藍芽 傳送 檔案

藍芽傳送檔案,須先準備兩台並配對好藍芽
1.AndroidManifest.xml 加上權限


2./res/layout/activity_main.xml 放個Button


3.MainActivity.java
package com.terryyamg.bluetoothdatatransfertest;

import android.bluetooth.BluetoothAdapter;
import android.content.Intent;
import android.content.pm.PackageManager;
import android.content.pm.ResolveInfo;
import android.net.Uri;
import android.os.Bundle;
import android.os.Environment;
import android.support.v7.app.AppCompatActivity;
import android.view.View;
import android.widget.Button;
import android.widget.Toast;

import java.io.File;
import java.io.FileOutputStream;
import java.io.IOException;
import java.util.List;

public class MainActivity extends AppCompatActivity {

    private static final int DISCOVER_DURATION = 300;
    private static final int REQUEST_BLU = 1;

    @Override
    protected void onCreate(Bundle savedInstanceState) {
        super.onCreate(savedInstanceState);
        setContentView(R.layout.activity_main);
        Button btSend = (Button) findViewById(R.id.btSend);
        btSend.setOnClickListener(new View.OnClickListener() {
            @Override
            public void onClick(View v) {
                sendViaBluetooth(v);
            }
        });
    }

    public void sendViaBluetooth(View v) {

        BluetoothAdapter btAdapter = BluetoothAdapter.getDefaultAdapter();

        if (btAdapter == null) {
            Toast.makeText(this, "裝置沒有藍芽", Toast.LENGTH_LONG).show();
        } else {
            enableBluetooth();
        }
    }

    //啟動藍芽
    public void enableBluetooth() {

        Intent discoveryIntent = new Intent(BluetoothAdapter.ACTION_REQUEST_DISCOVERABLE);
        //開啟藍芽時間
        discoveryIntent.putExtra(BluetoothAdapter.EXTRA_DISCOVERABLE_DURATION, DISCOVER_DURATION);

        startActivityForResult(discoveryIntent, REQUEST_BLU);
    }

    @Override
    protected void onActivityResult(int requestCode, int resultCode, Intent data) {

        if (resultCode == DISCOVER_DURATION && requestCode == REQUEST_BLU) {

            Intent intent = new Intent();
            intent.setAction(Intent.ACTION_SEND);
            intent.setType("text/plain");//檔案類型
            File file = new File(Environment.getExternalStorageDirectory(), "BluetoothTest.txt"); //建立傳送檔案名稱

            String content = "Hello"; //文件內容
            try {
                FileOutputStream fop = new FileOutputStream(file);

                if (!file.exists()) { // 如果檔案不存在,建立檔案
                    file.createNewFile();
                }
                byte[] contentInBytes = content.getBytes();// 取的字串內容bytes
                fop.write(contentInBytes); // 輸出
                fop.flush();
                fop.close();
            } catch (IOException e) {
                e.printStackTrace();
            }
            intent.putExtra(Intent.EXTRA_STREAM, Uri.fromFile(file));

            PackageManager pm = getPackageManager();
            List<ResolveInfo> appsList = pm.queryIntentActivities(intent, 0);
            if (appsList.size() > 0) {
                String packageName = null;
                String className = null;
                boolean found = false;

                for (ResolveInfo info : appsList) {
                    packageName = info.activityInfo.packageName;
                    if (packageName.equals("com.android.bluetooth")) {
                        className = info.activityInfo.name;
                        found = true;
                        break;
                    }
                }

                if (!found) {
                    Toast.makeText(this, "沒有找到藍芽", Toast.LENGTH_LONG).show();
                } else {
                    intent.setClassName(packageName, className);
                    startActivity(intent);
                }
            }
        } else {
            Toast.makeText(this, "取消", Toast.LENGTH_LONG).show();
        }
    }
}


檔案下載:
 https://github.com/terryyamg/BluetoothDataTransferTest
參考連結:
https://www.youtube.com/watch?v=6hQ87u9v7SY

2015年12月16日 星期三

Android 5.0 Lollipop Notification Lock Screen Visibility 鎖頻 通知

Android 5.0 Lollipop 通知訊息在鎖頻時,可以設定公開或是私密訊息

1.先設定手機
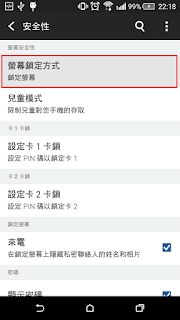
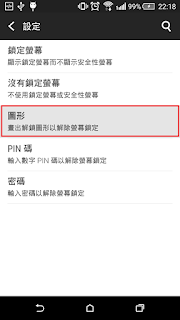
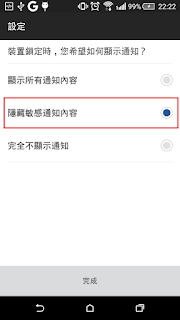
設定 ->安全性 -> 螢幕鎖定方式 ->選擇圖形、PIN碼或密碼 ->設定密碼完成 ->選擇隱藏敏感通知內容 ->完成

2./res/layout/activity_main.xml


3.MainActivity.java
package com.terryyamg.lollipopnotificationtest;

import android.app.Activity;
import android.app.Notification;
import android.app.NotificationManager;
import android.app.PendingIntent;
import android.content.Intent;
import android.os.Bundle;
import android.support.v4.app.NotificationCompat;
import android.view.View;
import android.widget.Button;

public class MainActivity extends Activity {
    @Override
    protected void onCreate(Bundle savedInstanceState) {
        super.onCreate(savedInstanceState);
        setContentView(R.layout.activity_main);

        Button btNotification = (Button) findViewById(R.id.btNotification);

        btNotification.setOnClickListener(new View.OnClickListener() {
            @Override
            public void onClick(View v) {
                Intent intent = new Intent(MainActivity.this, Detail.class); //點選後動作
                PendingIntent pIntent = PendingIntent.getActivity(MainActivity.this, (int) System.currentTimeMillis(), intent, 0);
                // addAction(int icon, CharSequence title, PendingIntent intent) Deprecated 的解決方法
                NotificationCompat.Action detailAction =
                        new NotificationCompat.Action.Builder(R.mipmap.ic_launcher, "Detail", pIntent).build();

                NotificationCompat.Builder builder = new NotificationCompat.Builder(MainActivity.this);
                builder.setSmallIcon(R.mipmap.ic_launcher);
                builder.setContentTitle("標題");
                builder.setContentText("內容");
                builder.setOngoing(false); //固定
//              builder.setFullScreenIntent(pIntent,true);//一直顯示在最上層 優先於setPriority
                builder.setPriority(Notification.PRIORITY_DEFAULT); //通知的位置 - Android 5.0 PRIORITY_MIN在底線以下
                builder.setVisibility(NotificationCompat.VISIBILITY_PRIVATE); //顯示訊息-VISIBILITY_PUBLIC 公開,VISIBILITY_PRIVATE私密
                builder.addAction(detailAction); //加入下方按鈕

                NotificationManager notificationManager =
                        (NotificationManager) getSystemService(NOTIFICATION_SERVICE);
                notificationManager.notify(0, builder.build());

            }
        });

    }
}
4./res/layout/detail.xml


5.Detail.java
package com.terryyamg.lollipopnotificationtest;

import android.app.Activity;
import android.os.Bundle;
import android.widget.TextView;

public class Detail extends Activity{
    @Override
    protected void onCreate(Bundle savedInstanceState) {
        super.onCreate(savedInstanceState);
        setContentView(R.layout.detail);

        TextView tvDetail = (TextView)findViewById(R.id.tvDetail);
        tvDetail.setText("跳進來了");
    }
}

設定為 VISIBILITY_PUBLIC時
設定為 VISIBILITY_PRIVATE時

檔案下載:
https://github.com/terryyamg/LollipopNotificationTest
參考連結
http://www.intertech.com/Blog/android-development-tutorial-lollipop-notifications/
https://developer.getpebble.com/blog/2014/12/19/Leverage-Android-Actionable-Notifications/
http://stackoverflow.com/questions/13808939/jelly-bean-the-method-setpriorityint-is-undefined-for-the-type-notification

2015年12月15日 星期二

Android Address 取得地址

以座標來取得住址位置
http://developer.android.com/reference/android/location/Address.html

1./res/layout/activity_main.xml 放個TextView


2.MainAcitvity.java
package com.terryyamg.addressestest;

import android.app.Activity;
import android.location.Address;
import android.location.Geocoder;
import android.os.Bundle;
import android.widget.TextView;

import java.io.IOException;
import java.util.List;

public class MainActivity extends Activity {

    @Override
    protected void onCreate(Bundle savedInstanceState) {
        super.onCreate(savedInstanceState);
        setContentView(R.layout.activity_main);

        TextView tvAddress = (TextView) findViewById(R.id.tvAddress);

        Geocoder geocoder = new Geocoder(this);
        List<Address> addresses = null;
        double lat = 22.6721740;
        double lon = 120.3100350;
        try {
            addresses = geocoder.getFromLocation(lat, lon, 1); //放入座標
        } catch (IOException e) {
            e.printStackTrace();
        }
        if (addresses != null && addresses.size() > 0) {
            Address address = addresses.get(0);
            String addressText = String.format("%s-%s%s%s%s",
                    address.getCountryName(), //國家
                    address.getAdminArea(), //城市
                    address.getLocality(), //區
                    address.getThoroughfare(), //路
                    address.getSubThoroughfare() //巷號
            );

            tvAddress.setText(addressText);
        }

    }

}


檔案下載:
https://github.com/terryyamg/AddressesTest
參考連結:
http://developer.android.com/reference/android/location/Address.html
http://wptrafficanalyzer.in/blog/android-reverse-geocoding-at-touched-location-in-google-map-android-api-v2/

2015年12月9日 星期三

Android MVP 設計模式 Spinner練習

練習MVP設計模式,以Spinner為例
將檔案切成Model View Presenter


1.在Layout放置一個Spinner元件
2.View - MainActivity.java
package com.terryyamg.mvptest;

import android.app.Activity;
import android.os.Bundle;
import android.view.View;
import android.widget.AdapterView;
import android.widget.ArrayAdapter;
import android.widget.Spinner;
import android.widget.Toast;

//View
public class MainActivity extends Activity implements MainActivityView {

    private Spinner spinner;
    private ArrayAdapter<String> listAdapter;

    private MainActivityPresenter presenter;

    @Override
    protected void onCreate(Bundle savedInstanceState) {
        super.onCreate(savedInstanceState);
        setContentView(R.layout.activity_main);
        spinner = (Spinner) findViewById(R.id.spinner);

        presenter = new MainActivityPresenterImpl(this);
        presenter.guide(); //導向
    }

    //Override MainActivityView 設定Adapter
    @Override
    public void setAdapter(String[] data) {
        listAdapter = new ArrayAdapter<>(this,
                android.R.layout.simple_spinner_item, data);
        listAdapter.setDropDownViewResource(android.R.layout.simple_spinner_dropdown_item);
    }

    //Override MainActivityView 設定Spinner動作
    @Override
    public void setSpinner(final String[] data) {
        spinner.setAdapter(listAdapter);
        spinner.setOnItemSelectedListener(new AdapterView.OnItemSelectedListener() {
            @Override
            public void onItemSelected(AdapterView<?> arg0, View arg1,
                                       int pos1, long arg3) {
                Toast.makeText(MainActivity.this, data[pos1], Toast.LENGTH_SHORT).show();
            }

            @Override
            public void onNothingSelected(AdapterView<?> arg0) {

            }
        });
    }
}

3.View - MainActivityView.java
package com.terryyamg.mvptest;

public interface MainActivityView {

    void setAdapter(String[] data);

    void setSpinner(String[] data);

}

4.Presenter - MainActivityPresenter.java
package com.terryyamg.mvptest;

public interface MainActivityPresenter {

    void guide();

}

5.Presenter - MainActivityPresenterImpl.java
package com.terryyamg.mvptest;

//Presenter
public class MainActivityPresenterImpl implements MainActivityPresenter {

    private MainActivityView mView;
    private MainActivityModel mModel;

    public MainActivityPresenterImpl(MainActivityView mView) {
        this.mView = mView;
        this.mModel = new MainActivityModelImpl();
    }


    @Override
    public void guide() {
        mModel.setData(mView); //導向Model
    }
}

6.Model - MainActivityModel.java
package com.terryyamg.mvptest;

public interface MainActivityModel {

    void setData(MainActivityView view);

}

7.Model - MainActivityModelImpl.java
package com.terryyamg.mvptest;

//Model
public class MainActivityModelImpl implements MainActivityModel {

    @Override
    public void setData(MainActivityView view) {
        String[] data = {"A", "B", "C", "D", "E"};

        //放入資訊
        view.setAdapter(data);
        view.setSpinner(data);
    }
}

完成後就可以得到一個與一般的spinner相同的效果

檔案下載:
 https://github.com/terryyamg/MVPTest
參考連結:
 https://github.com/antoniolg/androidmvp

2015年11月23日 星期一

Android Badger Icon 提示 通知 數字

icon上的數字提示通知,Android沒有內建的,所以使用第三方套件ShortcutBadger

使用IDE: Android Studio
1.建立新方案後,在build.gradle(Module:app)檔案裡的dependencies位置裡面加上 compile 'me.leolin:ShortcutBadger:1.1.3@aar' 下載該套件
dependencies {
    compile fileTree(dir: 'libs', include: ['*.jar'])
    testCompile 'junit:junit:4.12'
    compile 'com.android.support:appcompat-v7:23.1.1'
    compile 'me.leolin:ShortcutBadger:1.1.3@aar'
}
2.AndroidManifest.xml


3.res/layout/activity_main.xml


4.MainActivity.java
package com.terryyamg.shortcutbadgertext;

import android.app.Activity;
import android.content.Intent;
import android.content.pm.PackageManager;
import android.content.pm.ResolveInfo;
import android.os.Bundle;
import android.view.View;
import android.widget.Button;
import android.widget.EditText;
import android.widget.TextView;
import android.widget.Toast;

import me.leolin.shortcutbadger.ShortcutBadger;

public class MainActivity extends Activity {

    private int badgeCount;
    private EditText numInput;

    @Override
    protected void onCreate(Bundle savedInstanceState) {
        super.onCreate(savedInstanceState);
        setContentView(R.layout.activity_main);

        numInput = (EditText) findViewById(R.id.numInput);

        Button button = (Button) findViewById(R.id.btnSetBadge);
        button.setOnClickListener(new View.OnClickListener() {
            @Override
            public void onClick(View v) {
                badgeCount = 0;
                try {
                    badgeCount = Integer.parseInt(numInput.getText().toString());
                } catch (NumberFormatException e) {
                    Toast.makeText(MainActivity.this, "錯誤:", Toast.LENGTH_SHORT).show();
                }

                ShortcutBadger.with(MainActivity.this).count(badgeCount); //次數

                Toast.makeText(MainActivity.this, "通知次數=" + badgeCount, Toast.LENGTH_SHORT).show();
            }
        });


        //find the home launcher Package
        Intent intent = new Intent(Intent.ACTION_MAIN);
        intent.addCategory(Intent.CATEGORY_HOME);
        ResolveInfo resolveInfo = getPackageManager().resolveActivity(intent, PackageManager.MATCH_DEFAULT_ONLY);
        String currentHomePackage = resolveInfo.activityInfo.packageName;

        TextView textViewHomePackage = (TextView) findViewById(R.id.textViewHomePackage);
        textViewHomePackage.setText("手機型號:" + currentHomePackage);
    }

    @Override
    protected void onStart() {
        super.onStart();
        ShortcutBadger.with(this).remove(); //歸0
        Toast.makeText(this, "已讀", Toast.LENGTH_SHORT).show();
    }
}


檔案下載:
https://github.com/terryyamg/ShortcutBadgerText
參考連結:
https://github.com/leolin310148/ShortcutBadger

2015年10月13日 星期二

Android app intent other app 從一個App啟動另一個App特定頁面,附帶傳值

1.在App1加入程式碼
Intent intent = new Intent(Intent.ACTION_MAIN);
intent.setComponent(new ComponentName("com.xxxx.xxxx","com.xxxx.xxxx.SpecialMainActivity")); //包裹名稱,要開啟的頁面
intent.putExtra("value", "test"); //要傳送的值
startActivity(intent);
2.在App2的AndroidManifest.xml加入


3.在App2加入接收程式碼
Intent intent = getIntent();
if (intent.hasExtra("value")) {
 String value= intent.getStringExtra("value");
 Log.i("value", value+"");
}else{
 Log.i("value", "null");
}
參考連結:
http://stackoverflow.com/questions/3872063/launch-an-application-from-another-application-on-android

2015年8月20日 星期四

Android Web Url Activity 網頁連結啟動app

點選網頁超連結來啟動app
1.AndroidManifest.xml


2.activity_main.xml


3.MainActivity.java
package tw.android;

import java.util.List;

import android.app.Activity;
import android.net.Uri;
import android.os.Bundle;
import android.widget.TextView;

public class MainActivity extends Activity {
 private TextView textView1;

 /** Called when the activity is first created. */
 @Override
 public void onCreate(Bundle savedInstanceState) {
  super.onCreate(savedInstanceState);
  setContentView(R.layout.activity_main);

  textView1 = (TextView) findViewById(R.id.textView1);

  Uri data = getIntent().getData();
  if (data != null) {
   String scheme = data.getScheme(); // "uccu"
   // String host = data.getHost();
   List<String> params = data.getPathSegments();
   String first = params.get(0); // word1
   String second = params.get(1); // word2

   textView1.setText(scheme + ":///" + first + "/" + second);
  }else{
   textView1.setText("請從網頁來");
  }
 }
}
4.web.html
<!DOCTYPE html>
<html>
<head>
<title>Page Title</title>
</head>
<body>

<a href="uccu:///word1/word2/">啟動吧!!APP!!!</a>

</body>
</html> 


參考來源:
http://stackoverflow.com/questions/2958701/launch-custom-android-application-from-android-browser

2015年8月5日 星期三

iOS Swift Multiple PickerView Spinner 多重 關聯 連動 滾輪

2017.06.18 update Android的下拉選項為Spinner
相對應的iOS的為滾輪PickerView

1.首先在Main.storyboard拖拉一個Picker View元件
並點選右方Show the Connections inspector
dataSourcedelegate拉致上方圖片上三個小圖的最左邊小圖關聯
2.將storyboard元件拉至ViewController

3.ViewController繼承UIPickerViewDelegate, UIPickerViewDataSource

4.ViewController.swift

//
//  ThreePickerViewController.swift
//  MultiplePickerViewTest
//
//  Created by Terry Yang on 2017/6/18.
//  Copyright © 2017年 terryyamg. All rights reserved.
//

import UIKit

class ThreePickerViewController: UIViewController, UIPickerViewDelegate, UIPickerViewDataSource {
    
    @IBOutlet weak var picker3: UIPickerView!
    
    //第一輪
    var list1  = ["亞洲","歐洲"]
    //第二輪
    var list21 = ["日本","台灣"]
    var list22 = ["英國","德國","義大利"]
    //第三輪
    var list211 = ["東京","沖繩","北海道"]
    var list212 = ["台北","台中","台南","高雄","台東"]
    var list221 = ["倫敦"]
    var list222 = ["柏林"]
    var list223 = ["羅馬"]
    
    //init
    var island : String = "亞洲"
    var country : String = "日本"
    var city : String = ""
    
    override func viewDidLoad() {
        super.viewDidLoad()
        // Do any additional setup after loading the view, typically from a nib.
        picker3.delegate = self
        picker3.dataSource = self
    }
    
    override func didReceiveMemoryWarning() {
        super.didReceiveMemoryWarning()
        // Dispose of any resources that can be recreated.
    }
    
    //幾個滾輪
    func numberOfComponents(in pickerView: UIPickerView) -> Int {
        return 3
    }
    
    //確認各個滾輪有幾筆
    func pickerView(_ pickerView: UIPickerView, numberOfRowsInComponent component: Int) -> Int {
        //component - 第幾個滾輪
        switch(component){
        case 0:
            return list1.count
        case 1:
            return island == "亞洲" ? list21.count : list22.count
        case 2:
            switch country {
            case "日本":
                return list211.count
            case "台灣":
                return list212.count
            case "英國":
                return list221.count
            case "德國":
                return list222.count
            case "義大利":
                return list223.count
            default:
                return 0
            }
        default:
            return 0
        }
    }
    
    //放入內容
    func pickerView(_ pickerView: UIPickerView, titleForRow row: Int, forComponent component: Int) -> String? {
        switch(component){
        case 0:
            return list1[row]
        case 1:
            //true: 回傳第二輪的亞洲內容 false: 回傳第二輪的歐洲內容
            return island == "亞洲" ? list21[row] : list22[row]
        case 2:
            switch country {
            case "日本":
                return list211[row]
            case "台灣":
                return list212[row]
            case "英國":
                return list221[row]
            case "德國":
                return list222[row]
            case "義大利":
                return list223[row]
            default:
                return nil
            }
        default:
            return nil
        }
    }
    
    //回傳選擇的字串
    func pickerView(_ pickerView: UIPickerView, didSelectRow row: Int, inComponent component: Int) {
        switch component {
        case 0:
            island = list1[row]
            updateCountry(0)
            updateCity(0)
            print("洲: \(island)")
            //選擇第一個滾輪後-重新載入
            pickerView.reloadAllComponents()
            //第二個與第三個滾輪回到第一個項目
            pickerView.selectRow(0, inComponent: 1, animated: true)
            pickerView.selectRow(0, inComponent: 2, animated: true)
        case 1:
            updateCountry(row)
            updateCity(0)
            print("國: \(country)")
            //選擇第二個滾輪後-重新載入
            pickerView.reloadAllComponents()
            //第三個滾輪回到第一個項目
            pickerView.selectRow(0, inComponent: 2, animated: true)

        case 2:
            updateCity(row)
            print("城: \(city)")
        default:
            print("無")
        }
        
    }
    
    func updateCountry(_ row: Int){
        if island == "亞洲" {
            country = list21[row]
        } else {
            country = list22[row]
        }
    }
    
    func updateCity(_ row: Int){
        switch country {
        case "日本":
            city = list211[row]
        case "台灣":
            city = list212[row]
        case "英國":
            city = list221[row]
        case "德國":
            city = list222[row]
        case "義大利":
            city = list223[row]
        default:
            print("無")
        }
        
    }
    
}


檔案下載:
 https://github.com/terryyamg/MultiplePickerViewTest
參考來源:
http://stackoverflow.com/questions/30832489/reload-component-in-ui-picker-view-swift
https://stackoverflow.com/questions/11191062/how-to-reset-uipickerview-to-index0-iphone

2015年8月2日 星期日

iOS Swift 筆記 暫存 SharedPreferences StandardUserDefaults

Android的筆記暫存功能為SharedPreferences
iOS相同的功能為NSUserDefaults.standardUserDefaults()
        //儲存在記事本
        let preferencesSave = NSUserDefaults.standardUserDefaults()
        
        preferencesSave.setValue("張三豐", forKey: "name") //儲存字串
        preferencesSave.setBool(true, forKey: "boy") //儲存布林值
        preferencesSave.setDouble(178.5, forKey: "height") //儲存Double
        preferencesSave.setInteger(99, forKey: "year") //儲存int
        //儲存
        let didSave = preferencesSave.synchronize()


        //讀取記事本
        let preferencesRead = NSUserDefaults.standardUserDefaults()
        
        if preferencesRead.objectForKey("name") == nil {
                //  Doesn't exist
                NSLog("NO name", "...")       
        } else {
                let name = preferencesRead.stringForKey("name") //讀取字串
                let boy = preferencesRead.boolForKey("boy") //讀取布林值
                let height = preferencesRead.doubleForKey("height") //讀取Double
                let year = preferencesRead.integerForKey("year") //讀取int
                NSLog("name:\(name!)", "")
        }

參考連結:
http://stackoverflow.com/questions/19206762/equivalent-to-shared-preferences-in-ios

2015年7月15日 星期三

Android Volley Cache 緩衝 讀取 圖片

先下載資訊,在下滑ListView時,才進行網路讀取圖片。

1.先下載android-support-v4.jarvolley.jar,並在專案下建立libs資料夾,放入libs此資料夾

2.先建立一個list.json檔案,要存成UTF-8格式,並放入圖片url
[{
        "title": "鐵刀",
        "image": "http://terryyamg.3eeweb.com/test/pic/b01.JPG",
        "attack": 480,
        "attributes": "無",
        "material": ["燕雀石x3", "鐵礦石x8","大地的結晶x7", "砥石x12"]
    },
    {
        "title": "鐵刀【禊】",
        "image": "http://terryyamg.3eeweb.com/test/pic/b02.JPG",
        "attack": 528,
        "attributes": "無",
        "material": ["鐵礦石x10", "燕雀石x6", "大地的結晶x10"]
    },
    {
        "title": "鐵刀【神樂】",
        "image": "http://terryyamg.3eeweb.com/test/pic/b03.JPG",
        "attack": 576,
        "attributes": "無",
        "material": ["鐵礦石x15", "燕雀石x12", "大地的結晶x15"]
    },
    {
        "title": "斬破刀",
        "image": "http://terryyamg.3eeweb.com/test/pic/b04.JPG",
        "attack": 624,
        "attributes": "雷:250",
        "material": ["燕雀石x18", "大地的結晶x30", "電氣袋x3"]
    },
    {
        "title": "鬼斬破",
        "image": "http://terryyamg.3eeweb.com/test/pic/b05.JPG",
        "attack": 672,
        "attributes": "雷:380",
        "material": ["輝龍石x5", "燕雀石x20", "電氣袋x5"]
    },
    {
        "title": "鬼神斬破刀",
        "image": "http://terryyamg.3eeweb.com/test/pic/b06.JPG",
        "attack": 768,
        "attributes": "雷:490",
        "material": ["輝龍石x8", "靈鶴石x24", "電龍帶肉肋骨x2"]
    },
    {
        "title": "鬼神斬破刀【極】",
        "image": "http://terryyamg.3eeweb.com/test/pic/b07.JPG",
        "attack": 912,
        "attributes": "雷:620",
        "material": ["白鳩石x14", "電龍霜降肉x4", "祖龍角x1"]
    },
    {
        "title": "鐵刀【冰刃】",
        "image": "http://terryyamg.3eeweb.com/test/pic/b08.JPG",
        "attack": 528,
        "attributes": "冰:100",
        "material": ["鐵礦石x20", "冰結晶x12", "燕雀石x2"]
    },
    {
        "title": "白猿薙",
        "image": "http://terryyamg.3eeweb.com/test/pic/b09.JPG",
        "attack": 576,
        "attributes": "冰:150",
        "material": ["雪獅子的毛x6","鐵礦石x5","冰結晶x8"]
    },
    {
        "title": "白猿薙【中級】",
        "image": "http://terryyamg.3eeweb.com/test/pic/b10.JPG",
        "attack": 672,
        "attributes": "冰:250",
        "material": ["雪獅子王牙x3","雪獅子王的鬍鬚x5","冰結晶x20"]
    },
    {
        "title": "白猿薙【高級】",
        "image": "http://terryyamg.3eeweb.com/test/pic/b11.JPG",
        "attack": 864,
        "attributes": "冰:350",
        "material": ["雪獅子王的利牙x5","雪獅子的剛毛x8","雪獅子王尾x6"]
    },
    {
       "title": "白猿薙【驚嘆】",
        "image": "http://terryyamg.3eeweb.com/test/pic/b12.JPG",
        "attack": 1008,
        "attributes": "冰:560",
        "material": ["牙獸種的重牙x5","草食種的上皮x18","冰冷袋x3"]
    }]


3.AndroidManifest.xml先加入
uses-permission android:name="android.permission.INTERNET"

android:name=".AppController"


4./res/layout/activity_main.xml 主頁面放入ListView


5./res/layout/list.xml 建立客製化ListView項目


先建立AppControllerJsonArrayPostRequestLruBitmapCache三個檔案,此三個檔案不需要進行修改

6.AppController.java
package tw.android;

import com.android.volley.Request;
import com.android.volley.RequestQueue;
import com.android.volley.toolbox.ImageLoader;
import com.android.volley.toolbox.Volley;

import android.app.Application;
import android.text.TextUtils;
import android.util.Log;


public class AppController extends Application {

 public static final String TAG = AppController.class.getSimpleName();

 private RequestQueue mRequestQueue;
 private ImageLoader mImageLoader;

 private static AppController mInstance;

 @Override
 public void onCreate() {
  super.onCreate();
  mInstance = this;
  Log.i("mInstance.this", mInstance+"");
 }

 public static synchronized AppController getInstance() {
  return mInstance;
 }

 public RequestQueue getRequestQueue() {
  if (mRequestQueue == null) {
   mRequestQueue = Volley.newRequestQueue(getApplicationContext());
  }
  return mRequestQueue;
 }

 public ImageLoader getImageLoader() {
  getRequestQueue();
  if (mImageLoader == null) {
   mImageLoader = new ImageLoader(this.mRequestQueue,
     new LruBitmapCache());
  }
  return this.mImageLoader;
 }

 public <T> void addToRequestQueue(Request<T> req, String tag) {
  // set the default tag if tag is empty
  req.setTag(TextUtils.isEmpty(tag) ? TAG : tag);
  getRequestQueue().add(req);
 }

 public <T> void addToRequestQueue(Request<T> req) {
  req.setTag(TAG);
  getRequestQueue().add(req);
 }

 public void cancelPendingRequests(Object tag) {
  if (mRequestQueue != null) {
   mRequestQueue.cancelAll(tag);
  }
 }
}
7.JsonArrayPostRequest.java 編碼
package tw.android;

import java.io.UnsupportedEncodingException;

import org.json.JSONArray;
import org.json.JSONException;

import com.android.volley.NetworkResponse;
import com.android.volley.ParseError;
import com.android.volley.Request;
import com.android.volley.Response;
import com.android.volley.toolbox.HttpHeaderParser;

public class JsonArrayPostRequest extends Request<JSONArray> {

    private Response.Listener<JSONArray> mListener;
    public JsonArrayPostRequest(String url, Response.Listener<JSONArray> listener,
                                Response.ErrorListener errorListener){
        super(Method.GET, url, errorListener);
        mListener = listener;
    }

    @Override
    protected Response<JSONArray> parseNetworkResponse(NetworkResponse response) {
        try {

         /*utf-8 編碼 否則中文會出現亂碼*/
            String jsonString = new String(response.data, "UTF-8");
            return Response.success(new JSONArray(jsonString),
                    HttpHeaderParser.parseCacheHeaders(response));
        } catch (UnsupportedEncodingException e){
            return Response.error(new ParseError(e));
        } catch (JSONException je){
            return Response.error(new ParseError(je));
        }
    }
    @Override
    protected void deliverResponse(JSONArray response) {
        mListener.onResponse(response);
    }
}
8.LruBitmapCache.java 緩衝
package tw.android;

import android.graphics.Bitmap;
import android.support.v4.util.LruCache;

import com.android.volley.toolbox.ImageLoader.ImageCache;

/*緩衝*/
public class LruBitmapCache extends LruCache<String, Bitmap> implements
  ImageCache {
 public static int getDefaultLruCacheSize() {
  final int maxMemory = (int) (Runtime.getRuntime().maxMemory() / 1024);
  final int cacheSize = maxMemory / 8;

  return cacheSize;
 }

 public LruBitmapCache() {
  this(getDefaultLruCacheSize());
 }

 public LruBitmapCache(int sizeInKiloBytes) {
  super(sizeInKiloBytes);
 }

 @Override
 protected int sizeOf(String key, Bitmap value) {
  return value.getRowBytes() * value.getHeight() / 1024;
 }

 public Bitmap getBitmap(String url) {
  return get(url);
 }

 public void putBitmap(String url, Bitmap bitmap) {
  put(url, bitmap);
 }
}


再建立符合自己需要的清單
9.ListItem.java 清單資訊
package tw.android;

import java.util.ArrayList;

public class ListItem {

 private String title, thumbnailUrl,attributes;
 private int attack;
 private ArrayList material;

 public ListItem() {
 }

 public ListItem(String name, String thumbnailUrl, int attack, String attributes,
   ArrayList material) {
  this.title = name;
  this.thumbnailUrl = thumbnailUrl;
  this.attack = attack;
  this.attributes = attributes;
  this.material = material;
 }

 /* 名稱 */
 public String getTitle() {
  return title;
 }

 public void setTitle(String name) {
  this.title = name;
 }

 /* 縮圖 */
 public String getThumbnailUrl() {
  return thumbnailUrl;
 }

 public void setThumbnailUrl(String thumbnailUrl) {
  this.thumbnailUrl = thumbnailUrl;
 }

 /* 攻擊力 */
 public int getAttack() {
  return attack;
 }

 public void setAttack(int attack) {
  this.attack = attack;
 }

 /* 屬性 */
 public String getAttributes() {
  return attributes;
 }

 public void setAttributes(String attributes) {
  this.attributes = attributes;
 }

 /* 材料 */
 public ArrayList getMaterial() {
  return material;
 }

 public void setMaterial(ArrayList material) {
  this.material = material;
 }

}

10.CustomListAdapter.java 建立listview項目清單
package tw.android;

import java.util.List;

import android.app.Activity;
import android.content.Context;
import android.view.LayoutInflater;
import android.view.View;
import android.view.ViewGroup;
import android.widget.BaseAdapter;
import android.widget.TextView;

import com.android.volley.toolbox.ImageLoader;
import com.android.volley.toolbox.NetworkImageView;

public class CustomListAdapter extends BaseAdapter {
 private Activity activity;
 private LayoutInflater inflater;
 private List items;
 ImageLoader imageLoader = AppController.getInstance().getImageLoader();

 public CustomListAdapter(Activity activity, List items) {
  this.activity = activity;
  this.items = items;
 }

 public int getCount() {
  return items.size();
 }

 public Object getItem(int location) {
  return items.get(location);
 }

 public long getItemId(int position) {
  return position;
 }

 public View getView(int position, View convertView, ViewGroup parent) {

  if (inflater == null)
   inflater = (LayoutInflater) activity
     .getSystemService(Context.LAYOUT_INFLATER_SERVICE);
  if (convertView == null)
   convertView = inflater.inflate(R.layout.list, null);

  if (imageLoader == null)
   imageLoader = AppController.getInstance().getImageLoader();
  NetworkImageView thumbNail = (NetworkImageView) convertView
    .findViewById(R.id.thumbnail);
  TextView title = (TextView) convertView.findViewById(R.id.title);
  TextView attack = (TextView) convertView.findViewById(R.id.attack);
  TextView attributes = (TextView) convertView
    .findViewById(R.id.attributes);
  TextView material = (TextView) convertView.findViewById(R.id.material);

  // getting movie data for the row
  ListItem m = items.get(position);

  // 縮圖
  thumbNail.setImageUrl(m.getThumbnailUrl(), imageLoader);

  // 名稱
  title.setText(m.getTitle());

  // 攻擊力
  attack.setText("攻擊力: " + String.valueOf(m.getAttack()));

  // 屬性
  attributes.setText("屬性: " + m.getAttributes());

  // 材料
  String materialStr = "";
  for (String str : m.getMaterial()) {
   materialStr += str + ", ";
  }
  materialStr = materialStr.length() > 0 ? materialStr.substring(0,
    materialStr.length() - 2) : materialStr;
  material.setText(materialStr);

  return convertView;
 }

}

11.MainActivity.java 主頁面
package tw.android;

import java.util.ArrayList;
import java.util.List;

import org.json.JSONArray;
import org.json.JSONException;
import org.json.JSONObject;

import android.app.Activity;
import android.os.Bundle;
import android.widget.ListView;

import com.android.volley.Response;
import com.android.volley.VolleyError;
import com.android.volley.VolleyLog;

public class MainActivity extends Activity {// Log tag
 private static final String TAG = MainActivity.class.getSimpleName();

 // json檔案位置
 private static final String url = "http://terryyamg.3eeweb.com/test/list.json";

 private List listItem = new ArrayList();
 private ListView listView;
 private CustomListAdapter adapter;

 @Override
 protected void onCreate(Bundle savedInstanceState) {
  super.onCreate(savedInstanceState);
  setContentView(R.layout.activity_main);

  listView = (ListView) findViewById(R.id.list);
  adapter = new CustomListAdapter(this, listItem);
  listView.setAdapter(adapter); 
  
  // 取得資料並編碼
  JsonArrayPostRequest itemReq = new JsonArrayPostRequest(url,
    new Response.Listener() {

     public void onResponse(JSONArray response) {

      // 解析json
      for (int i = 0; i < response.length(); i++) {
       try {
        
        //取得回應物件
        JSONObject obj = response.getJSONObject(i);
        //取得對定標題並放入item內
        ListItem item = new ListItem();
        item.setTitle(obj.getString("title"));
        item.setThumbnailUrl(obj.getString("image"));
        item.setAttack(obj.getInt("attack"));
        item.setAttributes(obj.getString("attributes"));
        //多項目處理
        JSONArray materialArry = obj
          .getJSONArray("material");
        ArrayList material = new ArrayList();
        for (int j = 0; j < materialArry.length(); j++) {
         material.add((String) materialArry.get(j));
        }
        item.setMaterial(material);

        // 將所有項目item放入listItem陣列
        listItem.add(item);

       } catch (JSONException e) {
        e.printStackTrace();
       }

      }

      // 更新adapter數據
      adapter.notifyDataSetChanged();
     }
     
     
    }, new Response.ErrorListener() {

     public void onErrorResponse(VolleyError error) {
      VolleyLog.d(TAG, "Error: " + error.getMessage());

     }
    });

  // 使用AppController內的排序
  AppController.getInstance().addToRequestQueue(itemReq);
 }

 @Override
 public void onDestroy() {
  super.onDestroy();
 }


}

1.檔案下載:
https://github.com/terryyamg/CacheImageTest
 2.參考連結:
http://www.androidhive.info/2014/07/android-custom-listview-with-image-and-text-using-volley/
http://dnakreatif.com/programming/android-volley-jsonarray-post-with-params/
http://stackoverflow.com/questions/19267616/why-does-volleys-response-string-use-an-encoding-different-from-that-in-the-res

2015年7月5日 星期日

iOS Swift Time Format Compare 時間 格式 比較

Swift的時間格式化

1.ViewController.swift
class ViewController: UIViewController {

    override func viewDidLoad() {
        super.viewDidLoad()
        // Do any additional setup after loading the view, typically from a nib.
        //取得日期
        let date = NSDate()
        println(date) //原始
        var formatter = NSDateFormatter();
        formatter.dateFormat = "yyyy-MM-dd HH:mm:ss";
        let date2 = formatter.stringFromDate(date);
        
        println(date2) //格式為yyyy-MM-dd HH:mm:ss
        formatter.dateFormat = "yyyy/MM/dd";
        let date3 = formatter.stringFromDate(date);
        println(date3)//格式為yyyy/MM/dd

        //比較時間
        //現在時間
        let date = NSDate()
        let calendar = NSCalendar.currentCalendar()
        let components = calendar.components([.Month, .Day], fromDate: date) //只取月,日
        let dateNow = String(format: "%02d-%02d", components.month, components.day) //NSDate 轉 字串(格式 日-月)
        //自設時間
        let formatter = NSDateFormatter()
        formatter.dateFormat = "MM-dd" //日期格式
        formatter.timeZone = NSTimeZone(name: "UTC")
        let dateSet = "03-29" //自設時間
        
        let dateA = formatter.dateFromString(dateNow)! //字串 轉 NSDate
        let dateB = formatter.dateFromString(dateSet)! //字串 轉 NSDate
        print("DateA:\(dateA)")
        print("DateB:\(dateB)")
        // 比較
        switch dateA.compare(dateB) {
            case .OrderedAscending     :   print("Date A 比 date B 早")
            case .OrderedDescending    :   print("Date A 比 date B 晚")
            case .OrderedSame          :   print("同日")
        }

    }
}
參考來源:
http://www.brianjcoleman.com/tutorial-nsdate-in-swift/
http://iswift.org/cookbook/compare-2-dates

iOS Swift String Random 字串 亂數 亂碼

swift的隨機亂碼

1.FunctionHelper.swift
class FunctionHelper {

    // 產生亂碼 len-需要亂碼長度
    func randomString(len:Int) -> String {
        let charSet = "0123456789abcdefghijklmnopqrstuvwxyzABCDEFGHIJKLMNOPQRSTUVWXYZ"
        var c = Array(charSet)
        var s:String = ""
        for n in (1...len) {
            s.append(c[Int(arc4random()) % c.count])
        }
        return s
    }
    
}

2.ViewController.swift
class ViewController: UIViewController {

    override func viewDidLoad() {
        super.viewDidLoad()
        // Do any additional setup after loading the view, typically from a nib.
        let funHelper = FunctionHelper()
        var number = funHelper.randomString(8) //取8位
        println("產生得亂碼:\(number)")
    }
}
參考來源:
https://gist.github.com/szhernovoy/276e69eb90a0de84dd90

2015年7月2日 星期四

iOS CocoaPods libs 安裝套件

1.iOS安裝套件的方法,簡單說就是要用終端機下指令裝一個叫做CocoaPods的軟體,然後用這個軟體在專案下建立一個Podfile檔案,在這個檔案裡面寫入要取得的套件名稱,再進行安裝指令就會自動下載,跟Android Studio的方式比較像,詳細步驟在http://code4app.com/article/cocoapods-install-usage有介紹。

ps:在安裝CocoaPods時要有root權限,開啟設定root請參閱https://support.apple.com/zh-tw/HT204012 "如何啟用 root 使用者" 詳細步驟

2.沒提到的問題,下載套件時可能會出現錯誤
 
[!] Pods written in Swift can only be integrated as frameworks; this feature is still in beta. Add `use_frameworks!` to your Podfile or target to opt into using it.

此時安裝不完全會造成.xcworkspace檔案與Podfile.lock檔案產生不出來

因此要在Podfile加入"use_frameworks!"就可以順利安裝

參考 
http://stackoverflow.com/questions/29091522/error-running-pod-install-with-swift

安裝完成點選出現的.xcworkspace檔案開啟就可以使用了!!讚!!!

2015年6月29日 星期一

Android GestureOverlayView 辨識 手勢 繪圖

之前下載一個遊戲App Magic Touch ,使用GestureOverlayView 辨識手勢繪圖來消氣球,還蠻好玩的!

1.使用模擬器的Gesture Tool或是用手機前往Google Play下載Gesture Tool
安裝完成後,打開輸入對應的文字與繪圖

2.將該成是儲存的gestures檔案複製,建立一個新專案,在res資料夾建立raw資料加,丟到raw資料夾裡面

3./res/layout/activity_main.xml fadeDuration為繪圖顯示停留時間(毫秒)


4.MainActivity.java
package tw.android;

import java.util.ArrayList;

import android.app.Activity;
import android.gesture.Gesture;
import android.gesture.GestureLibraries;
import android.gesture.GestureLibrary;
import android.gesture.GestureOverlayView;
import android.gesture.GestureOverlayView.OnGesturePerformedListener;
import android.gesture.Prediction;
import android.os.Bundle;
import android.util.Log;
import android.widget.Toast;

public class MainActivity extends Activity implements
  OnGesturePerformedListener {

 private GestureOverlayView gesture;
 private GestureLibrary gLibrary;

 @Override
 protected void onCreate(Bundle savedInstanceState) {
  super.onCreate(savedInstanceState);
  setContentView(R.layout.activity_main);

  gesture = (GestureOverlayView) findViewById(R.id.gestureOverlayView1);

  // GestureOverlayView監聽事件
  gesture.addOnGesturePerformedListener(this);

  // 讀取製作的gestures檔案
  gLibrary = GestureLibraries.fromRawResource(this, R.raw.gestures);
  gLibrary.load();

 }

 public void onGesturePerformed(GestureOverlayView overlay, Gesture gesture) {
  
  ArrayList<Prediction> predictions = gLibrary.recognize(gesture);

  if (predictions.size() > 0) {

   Prediction prediction = predictions.get(0);
   Log.i("1111111", predictions.get(1) + "");
   if (prediction.score > 1.5) {// 符合 顯示對應訊息
    Toast.makeText(this, prediction.name, Toast.LENGTH_SHORT).show();
   } else { // 不符合
    Toast.makeText(this, "無法識別", Toast.LENGTH_SHORT).show();
   }
  }
 }
}


檔案下載:
https://github.com/terryyamg/GuestureOverlayViewTest
參考連結:
http://www.tutorialeshtml5.com/2013/02/tutorial-crear-y-reconocer-gestos-con.html
http://developer.android.com/reference/android/gesture/GestureOverlayView.html

2015年6月25日 星期四

Android Overlay WindowManager 覆蓋 小圖示 仿Fackbook Messager

Fackbook Messager收到訊息時會跳出一個小圖示,
此功能使用到WindowManager +Service
1.AndroidManifest.xml 加入權限與Service


2./res/layout/activity_main.xml 主畫面


3./res/layout/overlay.xml 小圖示


4.MainActivity.java
package tw.android;

import android.app.Activity;
import android.content.Intent;
import android.os.Bundle;
import android.view.View;
import android.view.WindowManager;
import android.widget.Button;

public class MainActivity extends Activity {

 private Button btOpen, btClose;
 WindowManager wm;

 /** Called when the activity is first created. */
 @Override
 public void onCreate(Bundle savedInstanceState) {
  super.onCreate(savedInstanceState);
  setContentView(R.layout.activity_main);

  btOpen = (Button) findViewById(R.id.btOpen);
  btClose = (Button) findViewById(R.id.btClose);

  // 啟動小圖示
  btOpen.setOnClickListener(new Button.OnClickListener() {
   public void onClick(View v) {
    Intent overlayIntent = new Intent();
    overlayIntent.setClass(MainActivity.this, OverlayService.class);
    MainActivity.this.startService(overlayIntent);
   }
  });

  // 關閉主畫面
  btClose.setOnClickListener(new Button.OnClickListener() {
   public void onClick(View v) {
    finish();
   }
  });

 }
}
5.OverlayService.java
package tw.android;

import android.app.Service;
import android.content.Intent;
import android.graphics.PixelFormat;
import android.os.IBinder;
import android.os.SystemClock;
import android.util.DisplayMetrics;
import android.util.Log;
import android.view.Display;
import android.view.Gravity;
import android.view.LayoutInflater;
import android.view.MotionEvent;
import android.view.View;
import android.view.View.OnClickListener;
import android.view.View.OnTouchListener;
import android.view.WindowManager;
import android.widget.ImageButton;

public final class OverlayService extends Service {

 private static final int LayoutParamFlags = WindowManager.LayoutParams.FLAG_WATCH_OUTSIDE_TOUCH
   | WindowManager.LayoutParams.FLAG_NOT_TOUCH_MODAL
   | WindowManager.LayoutParams.FLAG_NOT_FOCUSABLE
   | WindowManager.LayoutParams.FLAG_DISMISS_KEYGUARD
   | WindowManager.LayoutParams.FLAG_SHOW_WHEN_LOCKED;

 private LayoutInflater inflater;
 private Display mDisplay;
 private View layoutView;
 private WindowManager windowManager;
 private WindowManager.LayoutParams params;
 private View.OnTouchListener touchListener;
 private View.OnClickListener clickListener;

 private DisplayMetrics calculateDisplayMetrics() {
  DisplayMetrics mDisplayMetrics = new DisplayMetrics();
  mDisplay.getMetrics(mDisplayMetrics);
  return mDisplayMetrics;
 }

 @Override
 public IBinder onBind(Intent intent) {
  return null;
 }

 @Override
 public void onCreate() {
  super.onCreate();
  params = new WindowManager.LayoutParams(
    WindowManager.LayoutParams.WRAP_CONTENT,
    WindowManager.LayoutParams.WRAP_CONTENT,
    WindowManager.LayoutParams.TYPE_PRIORITY_PHONE,
    LayoutParamFlags, PixelFormat.TRANSLUCENT);
  params.gravity = Gravity.TOP | Gravity.LEFT; // 圖片按鈕的初始位置
  windowManager = (WindowManager) this.getSystemService(WINDOW_SERVICE);
  mDisplay = windowManager.getDefaultDisplay();
  inflater = LayoutInflater.from(this);
  layoutView = inflater.inflate(R.layout.overlay, null); // 取得layout
  windowManager.addView(layoutView, params);

  final ImageButton button = (ImageButton) layoutView
    .findViewById(R.id.toggle); // 取得圖片按鈕
  // 圖片按鈕-點擊監聽事件
  clickListener = new OnClickListener() {
   public void onClick(View view) {
    try {
     Log.i("Service", "stop!");
     // 關閉service
     Intent intent = new Intent(OverlayService.this,
       OverlayService.class);
     stopService(intent);
    } catch (Exception ex) {
    }
   }
  };

  // 圖片按鈕-移動監聽事件
  touchListener = new View.OnTouchListener() {
   private int initialX;
   private int initialY;
   private float initialTouchX;
   private float initialTouchY;
   private long downTime;

   public boolean onTouch(View v, MotionEvent event) {
    switch (event.getAction()) {
    case MotionEvent.ACTION_DOWN: // 按下圖片按鈕尚未放開時
     Log.i("downTime", downTime + "");
     downTime = SystemClock.elapsedRealtime();
     initialX = params.x;
     initialY = params.y;
     initialTouchX = event.getRawX();
     initialTouchY = event.getRawY();
     return true;
    case MotionEvent.ACTION_UP: // 放開圖片按鈕時
     long currentTime = SystemClock.elapsedRealtime();
     Log.i("currentTime - downTime", currentTime - downTime + "");
     if (currentTime - downTime < 200) { // 當按下圖片按鈕時
      v.performClick(); // 自動點擊事件
     } else {
      // updateViewLocation(); //黏住邊框功能
     }
     return true;
    case MotionEvent.ACTION_MOVE: // 按住移動時
     params.x = initialX
       + (int) (event.getRawX() - initialTouchX);
     params.y = initialY
       + (int) (event.getRawY() - initialTouchY);
     windowManager.updateViewLayout(layoutView, params);
     return true;
    }
    return false;
   }

   // 黏住邊框功能
   private void updateViewLocation() {
    DisplayMetrics metrics = calculateDisplayMetrics();
    int width = metrics.widthPixels / 2;
    if (params.x >= width)
     params.x = (width * 2) - 10;
    else if (params.x <= width)
     params.x = 10;
    windowManager.updateViewLayout(layoutView, params);
   }
  };

  button.setOnClickListener(clickListener); // 圖片按鈕-點擊監聽事件
  layoutView.setOnTouchListener(new OnTouchListener() {
   public boolean onTouch(View view, MotionEvent arg1) {
    return false;
   }
  });
  
  button.setOnTouchListener(touchListener);// 圖片按鈕-移動監聽事件
 }

 @Override
 public void onDestroy() {
  super.onDestroy();
  windowManager.removeView(layoutView);
 }
}


 點擊開啟小圖示後,出現小圖示,點選"離開畫,小圖示仍然存在,可移動,點擊後關閉service,小圖示消失

檔案下載:
 https://github.com/terryyamg/WindowManagerTest
參考連結:
https://github.com/keremkusmezer/OverlayDemo
http://developer.android.com/reference/android/view/WindowManager.LayoutParams.html

2015年6月18日 星期四

Android Skype 功能

運行Skype,並使用Skype API
1.res/layout/activity_main.xml


2.MainActivity.java
package tw.android;

import android.app.Activity;
import android.content.ComponentName;
import android.content.Context;
import android.content.Intent;
import android.content.pm.PackageManager;
import android.net.Uri;
import android.os.Bundle;
import android.view.View;
import android.view.View.OnClickListener;
import android.widget.Button;
import android.widget.EditText;
import android.widget.Toast;

public class MainActivity extends Activity {

 private EditText edt_skypeusername;
 private Button openskype, skypemsg, skypecall, skypevideocall;

 @Override
 protected void onCreate(Bundle savedInstanceState) {
  super.onCreate(savedInstanceState);
  setContentView(R.layout.activity_main);

  edt_skypeusername = (EditText) findViewById(R.id.edt_skypeusername);
  openskype = (Button) findViewById(R.id.openskype);
  skypemsg = (Button) findViewById(R.id.skypemsg);
  skypecall = (Button) findViewById(R.id.skypecall);
  skypevideocall = (Button) findViewById(R.id.skypevideocall);

  // 開啟skype

  openskype.setOnClickListener(new OnClickListener() {
   public void onClick(View v) {
    String mySkypeUri = "skype:"; // 傳入要啟動的動作
    SkypeUri(MainActivity.this, mySkypeUri);
   }
  });

  // 傳送訊息
  skypemsg.setOnClickListener(new OnClickListener() {

   public void onClick(View v) {
    String skypeName = edt_skypeusername.getText().toString()
      .trim();
    if (skypeName.length() <= 0) {
     Toast.makeText(getApplicationContext(), "請於上方輸入對方ID...",
       Toast.LENGTH_SHORT).show();
    } else {
     String mySkypeUri = "skype:" + skypeName + "?chat";// 傳入要啟動的動作
     SkypeUri(MainActivity.this, mySkypeUri);
    }
   }
  });

  // Skype Audio call button click event code here
  skypecall.setOnClickListener(new OnClickListener() {

   public void onClick(View v) {
    String skypeName = edt_skypeusername.getText().toString()
      .trim();
    if (skypeName.length() <= 0) {
     Toast.makeText(getApplicationContext(), "請於上方輸入對方ID...",
       Toast.LENGTH_SHORT).show();
    } else {
     String mySkypeUri = "skype:" + skypeName + "?call";// 傳入要啟動的動作
     SkypeUri(MainActivity.this, mySkypeUri);
    }
   }
  });

  // Skype Video call button click event code here
  skypevideocall.setOnClickListener(new OnClickListener() {

   public void onClick(View v) {
    String skypeName = edt_skypeusername.getText().toString()
      .trim();
    if (skypeName.length() <= 0) {
     Toast.makeText(getApplicationContext(), "請於上方輸入對方ID...",
       Toast.LENGTH_SHORT).show();
    } else {
     String mySkypeUri = "skype:" + skypeName
       + "?call&video=true";// 傳入要啟動的動作
     SkypeUri(MainActivity.this, mySkypeUri);
    }
   }
  });
 }

 public void SkypeUri(Context myContext, String mySkypeUri) {

  if (!isSkypeClientInstalled(myContext)) { // 判斷是否有安裝skype
   goToMarket(myContext); // 沒有安裝前往商店安裝
   return;
  }
  Uri skypeUri = Uri.parse(mySkypeUri);
  Intent myIntent = new Intent(Intent.ACTION_VIEW, skypeUri);
  myIntent.setComponent(new ComponentName("com.skype.raider",
    "com.skype.raider.Main"));
  myIntent.setFlags(Intent.FLAG_ACTIVITY_NEW_TASK);
  myContext.startActivity(myIntent);

  return;
 }

 // 判斷是否有安裝skype
 public boolean isSkypeClientInstalled(Context myContext) {
  PackageManager myPackageMgr = myContext.getPackageManager();
  try {
   myPackageMgr.getPackageInfo("com.skype.raider",
     PackageManager.GET_ACTIVITIES);
  } catch (PackageManager.NameNotFoundException e) {
   return (false);
  }
  return (true);
 }

 // 前往商店安裝

 public void goToMarket(Context myContext) {
  Uri marketUri = Uri.parse("market://details?id=com.skype.raider");
  Intent myIntent = new Intent(Intent.ACTION_VIEW, marketUri);
  myIntent.setFlags(Intent.FLAG_ACTIVITY_NEW_TASK);
  myContext.startActivity(myIntent);
  return;
 }
}

檔案下載:
https://github.com/terryyamg/SkypeTest
參考連結:
https://msdn.microsoft.com/zh-tw/library/office/dn745882.aspx
http://www.limbaniandroid.com/2014/01/how-to-make-skype-audiovideo-call-and.html

2015年6月17日 星期三

iOS Swift Login 練習 登入系統

iOS開發開始
先練習一個登入功能頁面
用到
Label元件
Button元件
TextField元件
頁面切換功能

1.先建立一個Single View Application空白專案

2.打開Main.storyboard 拉一個登入畫面

在右方再拉一個登入成功頁面,並在identity的Storyboard ID 輸入任意名稱,下方Use Storyboard ID 打勾。


3.ViewController.swift
import UIKit

class ViewController: UIViewController {
    
    @IBOutlet weak var account: UITextField! //輸入帳號
    @IBOutlet weak var password: UITextField! //輸入密碼
    @IBOutlet weak var info: UILabel! //訊息
    let myAccount = "apple" //驗證帳號
    let myPassword = "123" //驗證密碼
    
    override func viewDidLoad() {
        super.viewDidLoad()
        // Do any additional setup after loading the view, typically from a nib.
    }
    
    override func didReceiveMemoryWarning() {
        super.didReceiveMemoryWarning()
        // Dispose of any resources that can be recreated.
    }
    
    //登入
    @IBAction func login(sender: UIButton) {
        if account.text == myAccount && password.text == myPassword {
            self.info.text = "成功"
            
            //傳至下一頁面
            let viewController:UIViewController = UIStoryboard(name: "Main", bundle: nil).instantiateViewControllerWithIdentifier("MainActivity")
            
            self.presentViewController(viewController, animated: false, completion: nil)
            // 返回 self.dismissViewControllerAnimated(true, completion: nil)
            
        }else{
            self.info.text = "輸入錯囉"
        }
    }
    
    //清除
    @IBAction func reset(sender: UIButton) {
        account.text = ""
        password.text = ""
    }
    
}

參考連結: https://coderwall.com/p/cjuzng/swift-instantiate-a-view-controller-using-its-storyboard-name-in-xcode

2015年6月14日 星期日

Android LeetCode Happy Number 解題

動動腦,不會老
題目: https://leetcode.com/problems/happy-number/
Write an algorithm to determine if a number is "happy".
A happy number is a number defined by the following process: Starting with any positive integer, replace the number by the sum of the squares of its digits, and repeat the process until the number equals 1 (where it will stay), or it loops endlessly in a cycle which does not include 1. Those numbers for which this process ends in 1 are happy numbers.
Example: 19 is a happy number
  • 12 + 92 = 82
  • 82 + 22 = 68
  • 62 + 82 = 100
  • 12 + 02 + 02 = 1

用Android app試著做一個
1./res/layout/main.xml


2.MainActivity.java
package tw.android;

import android.app.Activity;
import android.os.Bundle;
import android.util.Log;
import android.view.View;
import android.widget.Button;
import android.widget.EditText;
import android.widget.TextView;

public class Main extends Activity {

 private EditText etNumber;
 private Button btSend;
 private TextView tvInfo;

 private int[] numberArray;

 /** Called when the activity is first created. */
 @Override
 public void onCreate(Bundle savedInstanceState) {
  super.onCreate(savedInstanceState);
  setContentView(R.layout.main);

  etNumber = (EditText) findViewById(R.id.etNumber);
  btSend = (Button) findViewById(R.id.btSend);
  tvInfo = (TextView) findViewById(R.id.tvInfo);

  btSend.setOnClickListener(new Button.OnClickListener() {
   public void onClick(View v) {
    int number = Integer.parseInt(etNumber.getText().toString()); // 輸入數字
    if (isHappy(number)) {
     tvInfo.setText(number + "是 Happy Number");
    } else {
     tvInfo.setText(number + "不是 Happy Number");
    }

   }
  });

 }

 /*
  * Write an algorithm to determine if a number is "happy".
  * 
  * A happy number is a number defined by the following process: Starting
  * with any positive integer, replace the number by the sum of the squares
  * of its digits, and repeat the process until the number equals 1 (where it
  * will stay), or it loops endlessly in a cycle which does not include 1.
  * Those numbers for which this process ends in 1 are happy numbers.
  * 
  * Example: 19 is a happy number
  * 
  * 1^2 + 9^2 = 82 
  * 8^2 + 2^2 = 68 
  * 6^2 + 8^2 = 100 
  * 1^2 + 0^2 + 0^2 = 1
  */

 /* 回傳驗證是否為happy number */
 public boolean isHappy(int n) {
  Log.i("keyNumber:", n + "");
  int sum, length;
  do {
   sum = getNumber(n, Integer.toString(n).length());
   length = Integer.toString(sum).length(); // 總和數字長度
   n = sum;
  } while (length != 1);// 重複執行到剩個位數
  
  Log.i("sum:", sum + "");
  if (sum == 1) { // 個位數等於1 happy number!!
   return true;
  } else { // 不是happy number...
   return false;
  }
 }

 /* 取得每個數字 放入數字陣列 計算總合 */
 public int getNumber(int n, int length) {
  /* 建立每個數字陣列 */
  numberArray = new int[length];
  int quotient = 0;// 商數
  int sum = 0; // 總合
  for (int i = 0; i < length; i++) {
   if (i == 0) { // 一開始輸入的數字計算
    numberArray[i] = n % 10; // 獲得餘數
    quotient = n / 10; // 獲得商數
   } else { // 計算後的總合再計算
    numberArray[i] = quotient % 10; // 獲得餘數
    quotient = quotient / 10; // 獲得商數
   }
   sum += (int) Math.pow(numberArray[i], 2); // 計算總和

  }
  return sum; // 回傳總和
 }

}


檔案下載:https://github.com/terryyamg/HappyNumberTest