顯示具有 Multiple 標籤的文章。 顯示所有文章

2017年8月21日 星期一

iOS Swift Multiple Language Localizable 切換多語系

不是認手機語系, 而是直接在app上切換語系

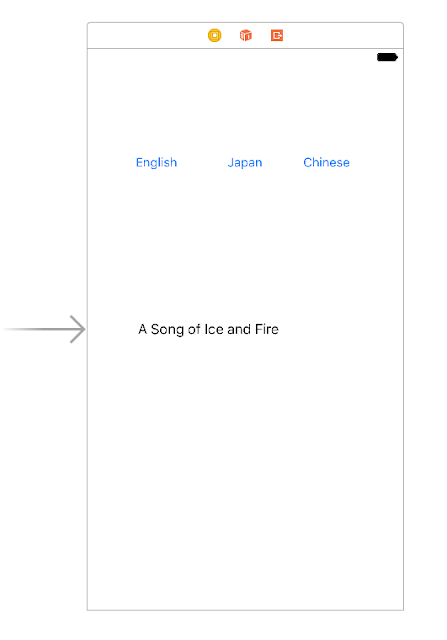
1.在Main.storyboard 拉三個按鈕與一個Label


2.與ViewController.swift建立連接
import UIKit

class ViewController: UIViewController {
    
    @IBOutlet weak var labMessage: UILabel!
    

    override func viewDidLoad() {
        super.viewDidLoad()
    }

    override func didReceiveMemoryWarning() {
        super.didReceiveMemoryWarning()
        // Dispose of any resources that can be recreated.
    }

    @IBAction func btnEnglish(_ sender: UIButton) {
        UserDefaults.standard.set("Base", forKey: "lang") //儲存語系為基本
        setMessage()
    }
    
    @IBAction func btnJapan(_ sender: UIButton) {
        UserDefaults.standard.set("ja", forKey: "lang") //儲存語系為日文
        setMessage()
    }
    
    @IBAction func btnChinses(_ sender: UIButton) {
        UserDefaults.standard.set("zh-Hant", forKey: "lang") //儲存語系為繁體中文
        setMessage()
    }
    
    func setMessage() {
        labMessage.text = "A Song of Ice and Fire".localized //使用擴展功能 localized
    }

}

extension String{

    var localized: String {
                
        let lang = UserDefaults.standard.string(forKey: "lang")
        
        let bundle = Bundle(path: Bundle.main.path(forResource: lang, ofType: "lproj")!)

        return NSLocalizedString(self, tableName: nil, bundle: bundle!, value: "", comment: "")
        
    }
}

3.建立Localizable.strings檔案
New File... -> 找到 String File  -> 輸入Localizable.strings -> Create
建立完成後點選檔案->右邊的 ->再點選Localize...

4.回到PROJECTInfo 點選Localizations的 + 會出現所有語言, 這裡選擇Japanese(ja)與Chinses(zh-Hant), 括弧內為設定文字對應的縮寫

勾選建立的Localizable.strings就好

 接著Localizable.strings會出現三個檔案

分別在 Localizable.strings(Base)輸入
"A Song of Ice and Fire" = "A Song of Ice and Fire";

Localizable.strings(Japanese)輸入
"A Song of Ice and Fire" = "氷と炎の歌";

Localizable.strings(Chinese(Traditional))輸入
"A Song of Ice and Fire" = "冰與火之歌"; 


檔案下載:
https://github.com/terryyamg/MultipleLanguageTest
參考連結:
https://stackoverflow.com/questions/25081757/whats-nslocalizedstring-equivalent-in-swift
https://medium.com/lean-localization/ios-localization-tutorial-938231f9f881
2015年8月5日 星期三

iOS Swift Multiple PickerView Spinner 多重 關聯 連動 滾輪

2017.06.18 update Android的下拉選項為Spinner
相對應的iOS的為滾輪PickerView

1.首先在Main.storyboard拖拉一個Picker View元件
並點選右方Show the Connections inspector
dataSourcedelegate拉致上方圖片上三個小圖的最左邊小圖關聯
2.將storyboard元件拉至ViewController

3.ViewController繼承UIPickerViewDelegate, UIPickerViewDataSource

4.ViewController.swift

//
//  ThreePickerViewController.swift
//  MultiplePickerViewTest
//
//  Created by Terry Yang on 2017/6/18.
//  Copyright © 2017年 terryyamg. All rights reserved.
//

import UIKit

class ThreePickerViewController: UIViewController, UIPickerViewDelegate, UIPickerViewDataSource {
    
    @IBOutlet weak var picker3: UIPickerView!
    
    //第一輪
    var list1  = ["亞洲","歐洲"]
    //第二輪
    var list21 = ["日本","台灣"]
    var list22 = ["英國","德國","義大利"]
    //第三輪
    var list211 = ["東京","沖繩","北海道"]
    var list212 = ["台北","台中","台南","高雄","台東"]
    var list221 = ["倫敦"]
    var list222 = ["柏林"]
    var list223 = ["羅馬"]
    
    //init
    var island : String = "亞洲"
    var country : String = "日本"
    var city : String = ""
    
    override func viewDidLoad() {
        super.viewDidLoad()
        // Do any additional setup after loading the view, typically from a nib.
        picker3.delegate = self
        picker3.dataSource = self
    }
    
    override func didReceiveMemoryWarning() {
        super.didReceiveMemoryWarning()
        // Dispose of any resources that can be recreated.
    }
    
    //幾個滾輪
    func numberOfComponents(in pickerView: UIPickerView) -> Int {
        return 3
    }
    
    //確認各個滾輪有幾筆
    func pickerView(_ pickerView: UIPickerView, numberOfRowsInComponent component: Int) -> Int {
        //component - 第幾個滾輪
        switch(component){
        case 0:
            return list1.count
        case 1:
            return island == "亞洲" ? list21.count : list22.count
        case 2:
            switch country {
            case "日本":
                return list211.count
            case "台灣":
                return list212.count
            case "英國":
                return list221.count
            case "德國":
                return list222.count
            case "義大利":
                return list223.count
            default:
                return 0
            }
        default:
            return 0
        }
    }
    
    //放入內容
    func pickerView(_ pickerView: UIPickerView, titleForRow row: Int, forComponent component: Int) -> String? {
        switch(component){
        case 0:
            return list1[row]
        case 1:
            //true: 回傳第二輪的亞洲內容 false: 回傳第二輪的歐洲內容
            return island == "亞洲" ? list21[row] : list22[row]
        case 2:
            switch country {
            case "日本":
                return list211[row]
            case "台灣":
                return list212[row]
            case "英國":
                return list221[row]
            case "德國":
                return list222[row]
            case "義大利":
                return list223[row]
            default:
                return nil
            }
        default:
            return nil
        }
    }
    
    //回傳選擇的字串
    func pickerView(_ pickerView: UIPickerView, didSelectRow row: Int, inComponent component: Int) {
        switch component {
        case 0:
            island = list1[row]
            updateCountry(0)
            updateCity(0)
            print("洲: \(island)")
            //選擇第一個滾輪後-重新載入
            pickerView.reloadAllComponents()
            //第二個與第三個滾輪回到第一個項目
            pickerView.selectRow(0, inComponent: 1, animated: true)
            pickerView.selectRow(0, inComponent: 2, animated: true)
        case 1:
            updateCountry(row)
            updateCity(0)
            print("國: \(country)")
            //選擇第二個滾輪後-重新載入
            pickerView.reloadAllComponents()
            //第三個滾輪回到第一個項目
            pickerView.selectRow(0, inComponent: 2, animated: true)

        case 2:
            updateCity(row)
            print("城: \(city)")
        default:
            print("無")
        }
        
    }
    
    func updateCountry(_ row: Int){
        if island == "亞洲" {
            country = list21[row]
        } else {
            country = list22[row]
        }
    }
    
    func updateCity(_ row: Int){
        switch country {
        case "日本":
            city = list211[row]
        case "台灣":
            city = list212[row]
        case "英國":
            city = list221[row]
        case "德國":
            city = list222[row]
        case "義大利":
            city = list223[row]
        default:
            print("無")
        }
        
    }
    
}


檔案下載:
 https://github.com/terryyamg/MultiplePickerViewTest
參考來源:
http://stackoverflow.com/questions/30832489/reload-component-in-ui-picker-view-swift
https://stackoverflow.com/questions/11191062/how-to-reset-uipickerview-to-index0-iphone