1.建立一個xib檔案 File -> New -> File ... 選擇View
2.MyView.xib
a.建立 MyView.xib 並拉一個Label到視窗
b.選擇View
c.設定屬性Size:Freeform 其他None
3.建立MyView.Swift
//
//  MyView.swift
//  JumpViewTest
//
//  Created by Terry Yang on 2017/6/30.
//  Copyright © 2017年 terryyamg. All rights reserved.
//

import UIKit

class MyView: UIView {

    @IBOutlet weak var labCustom: UILabel!

    var view:UIView!

    // Label Inspectable
    @IBInspectable
    var mytitleLabelText: String? {
        get {
            return labCustom.text
        }
        set(mytitleLabelText) {
            labCustom.text = mytitleLabelText
        }
    }

    override init(frame: CGRect) {
        super.init(frame: frame)
        setup()
    }

    required init?(coder aDecoder: NSCoder) {
        super.init(coder: aDecoder)
        setup()
    }

    func setup() {
        view = loadViewFromNib()
        view.frame = bounds
        view.autoresizingMask = [
            UIViewAutoresizing.flexibleWidth,
            UIViewAutoresizing.flexibleHeight
        ]
        addSubview(view)
    }

    func loadViewFromNib() -> UIView {
        let bundle = Bundle(for: type(of: self))
        let nib = UINib(nibName: "MyView", bundle: bundle)
        let view = nib.instantiate(withOwner: self, options: nil)[0] as! UIView

        return view
    }

}
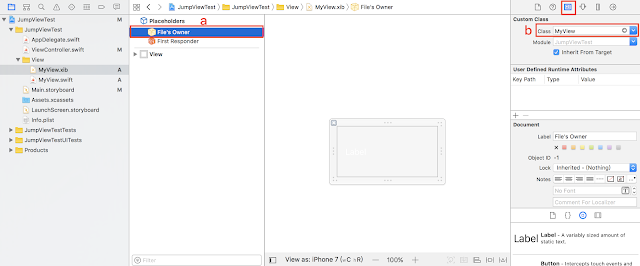
4.在MyView.xiba.選擇File;s Owner
b.點擊Identity並選擇Class 對應到 MyView
5.連結Label到MyView.swift
6.於Main.storyboard建立四個按鈕
7.ViewController.swift
//
//  ViewController.swift
//  JumpViewTest
//
//  Created by Terry Yang on 2017/6/30.
//  Copyright © 2017年 terryyamg. All rights reserved.
//

import UIKit

class ViewController: UIViewController {

    var indexOfTop : Int    = 0
    var indexOfLeft : Int   = 0
    var indexOfRight : Int  = 0
    var indexOfBottom : Int = 0

    var topView : MyView?
    var leftView : MyView?
    var rightView : MyView?
    var bottomView : MyView?

    override func viewDidLoad() {
        super.viewDidLoad()
        // Do any additional setup after loading the view, typically from a nib.

    }

    override func didReceiveMemoryWarning() {
        super.didReceiveMemoryWarning()
        // Dispose of any resources that can be recreated.
    }

    //  Top 按鈕
    @IBAction func btnShowTop(_ sender: UIButton) {
        indexOfTop += 1

        if topView == nil {
            //建立客製化View視窗
            topView = MyView(frame: CGRect(x: 0, y: -150, width: UIScreen.main.bounds.size.width, height: 150)) //設定初始位置與大小
            topView?.backgroundColor = .red //背景顏色
            topView?.labCustom.text = "Oh! Top View" //顯示文字
            self.view.addSubview(topView!) //加入此視窗
        }

        if indexOfTop % 2 == 1 { //點擊展開視窗
            UIView.animate(withDuration: 0.5, animations: {
                self.topView?.frame.origin.y += 150
            }, completion: nil)
        } else { //點擊收起視窗
            UIView.animate(withDuration: 0.5, animations: {
                self.topView?.frame.origin.y -= 150
            }, completion: nil)
        }
    }

    // Left 按鈕
    @IBAction func btnShowLeft(_ sender: UIButton) {

        indexOfLeft += 1

        if leftView == nil {
            leftView = MyView(frame: CGRect(x: -150, y: 0, width: 150, height: UIScreen.main.bounds.size.height))
            leftView?.backgroundColor = .brown
            leftView?.labCustom.text = "It's Left"
            self.view.addSubview(leftView!)
        }

        if indexOfLeft % 2 == 1 {
            UIView.animate(withDuration: 0.5, animations: {
                self.leftView?.frame.origin.x += 150
            }, completion: nil)
        } else {
            UIView.animate(withDuration: 0.5, animations: {
                self.leftView?.frame.origin.x -= 150
            }, completion: nil)
        }

    }

    // Right 按鈕
    @IBAction func btnShowRight(_ sender: UIButton) {

        indexOfRight += 1

        if rightView == nil {
            rightView = MyView(frame: CGRect(x: view.frame.maxX, y: 0, width: 150, height: UIScreen.main.bounds.size.height))
            rightView?.backgroundColor = .green
            rightView?.labCustom.text = "It's Right"
            self.view.addSubview(rightView!)
        }

        if indexOfRight % 2 == 1 {
            UIView.animate(withDuration: 0.5, animations: {
                self.rightView?.frame.origin.x -= 150
            }, completion: nil)
        } else {
            UIView.animate(withDuration: 0.5, animations: {
                self.rightView?.frame.origin.x += 150
            }, completion: nil)
        }

    }

    // Bottom 按鈕
    @IBAction func btnShowBootom(_ sender: UIButton) {
        indexOfBottom += 1

        if bottomView == nil {
            bottomView = MyView(frame: CGRect(x: 0, y: view.frame.maxY, width: UIScreen.main.bounds.size.width, height: 150))
            bottomView?.backgroundColor = .black
            bottomView?.labCustom.text = "Hi! Bottom View"
            self.view.addSubview(bottomView!)
        }

        if indexOfBottom % 2 == 1 {
            UIView.animate(withDuration: 0.5, animations: {
                self.bottomView?.frame.origin.y -= 150
            }, completion: nil)
        } else {
            UIView.animate(withDuration: 0.5, animations: {
                self.bottomView?.frame.origin.y += 150
            }, completion: nil)
        }
    }


}
檔案下載:
https://github.com/terryyamg/JumpViewTest
參考連結:
https://stackoverflow.com/documentation/ios/1362/custom-uiviews-from-xib-files#t=201706280220545656796
https://www.youtube.com/watch?v=EBYdsYwoJVI&t=492s
https://www.youtube.com/watch?v=MMgfnrddOxY


